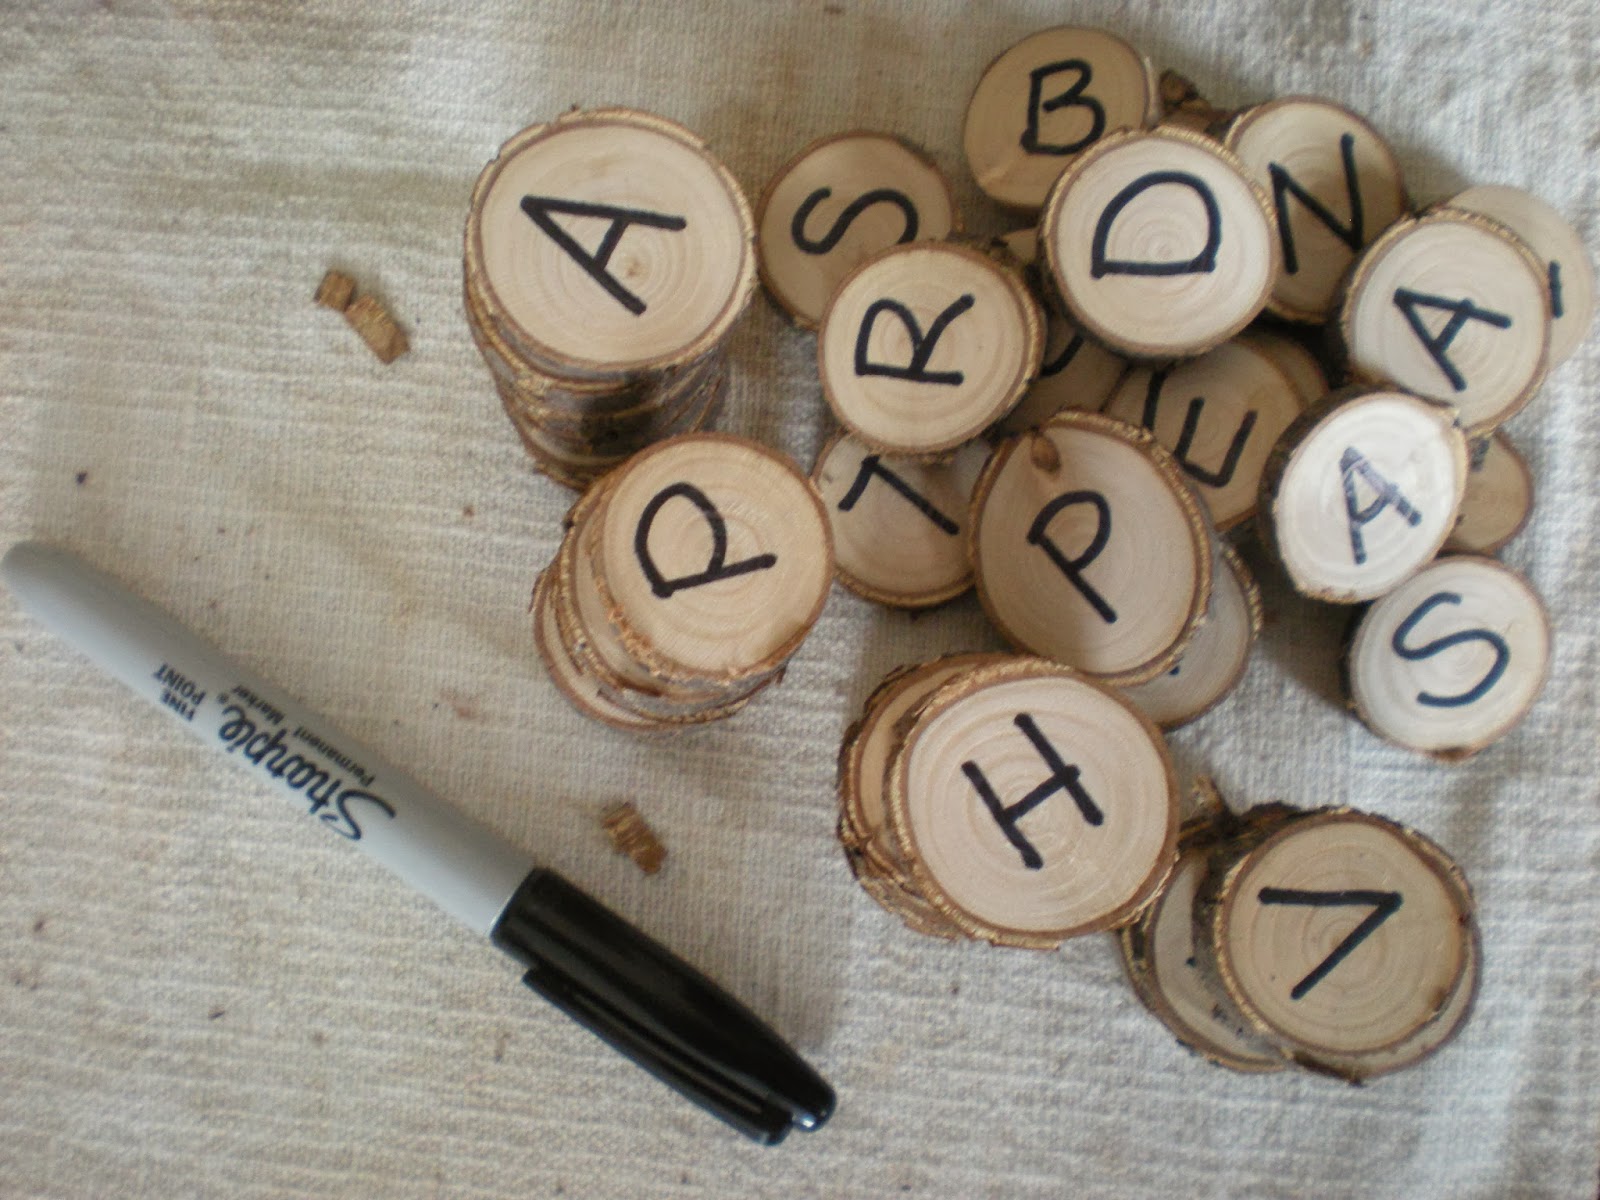
Yesterday, I shared a few branch slice project ideas (you can see the whole list over here). N walked right in and started rearranging the few letters I had made to make other words, and asked if they were for Carlisle (the August show I will be doing...a kind of pioneer festival). What a great idea!
I made one full set of the alphabet and then just used up the rest of the slices in my mason jar making duplicates of the most popular letters. If you are wondering why I have a mason jar full of branch slices, they are left over from the name tags I made for the Earth SmART Art Show at the boys' school two years ago.
At the show last year, everybody with small children walked straight past my booth (I make and sell pottery, by the way) so that their children wouldn't break things. I have been trying to think of something I could arrange so that the small children could "hang out" while their parents have a quick peek. So, I have wrapped these up in a little cloth bag to take with me. I will spread out a blanket near the door of my booth (we are on grass, in a big open field) and have these available to play with. I will be keeping an eye out for other simple, old-fashioned, natural entertainment I can add to the blanket.
Isn't the boy clever?
Tuesday, 21 January 2014
Monday, 20 January 2014
Playing around with gift tag ideas
Yesterday I was working on a blog post for the Rural Creators' Collective, and I think I may have come up with this years' gift tags. You can see the full post on the link above, but the ideas I think I may work with for myself are here.
I picture these strung on a length of yarn and wrapped around the package. Each package can have a different word, maybe?
I am really liking the lady bugs for spring gift tags.
And this may be the idea I use throughout the year...the picture is from an old, ripped picture book and is just modge podged onto the branch slice. I think I will make up a big batch for all seasons, and then a separate batch for Christmas gifts for the teachers.
Did you work on any quick crafts this weekend?
Linking up with: Homemade Monday at Frugal by Choice, Cheap by Necessity
Thursday, 16 January 2014
Planning ahead - Knitting for Christmas
I got myself into a bit of a jackpot this year. Normally, I have everything all planned out and work on projects throughout the year so that by the time Winter Solstice and Christmas come around, I'm ready without any last minute stress. Not this past year...nope...this past year I ended up scratching just about everything off the list, and as a result, I feel like we didn't really celebrate "properly". No homemade cards were sent, no gifts to the staff at the school (other than for N's teachers), a 6 hour trip to the emergency room eliminated our winter solstice celebration...and on and on.
So, in an effort to get a few things done in advance, I am really hoping to finish up one project every month so the same thing doesn't happen again. First up, is a little knit tie inspired by this one over at The Purl Bee.
The safety pin is to make me feel better. It's hard to see the progress as I go, so every night I move the safety pin up to where I am starting from and I knit until I can see that I have done a few inches.
Some nights I only manage two inches, sometimes up to four. I'm using a ball of sock yarn from my stash so that I have an even pattern without doing colourwork. I am hoping to have this project finished up by the end of the month, and if I do a few inches every day, it should actually happen. Then hopefully it will actually make it to Christmas! A little someone I know doesn't own a tie and needs one from time to time, so knowing me, it is quite possible that it will come out of the "gift stash" at some point throughout the year. We will see how it goes.
If anyone else wants to play along, we can help keep each other inspired. Feel free to leave a comment on any posts to share what have planned and/or what you are working on. Happy crafting!
Linking up with: Fiber Arts Friday over at Wisdom Begins in Wonder
So, in an effort to get a few things done in advance, I am really hoping to finish up one project every month so the same thing doesn't happen again. First up, is a little knit tie inspired by this one over at The Purl Bee.
The safety pin is to make me feel better. It's hard to see the progress as I go, so every night I move the safety pin up to where I am starting from and I knit until I can see that I have done a few inches.
Some nights I only manage two inches, sometimes up to four. I'm using a ball of sock yarn from my stash so that I have an even pattern without doing colourwork. I am hoping to have this project finished up by the end of the month, and if I do a few inches every day, it should actually happen. Then hopefully it will actually make it to Christmas! A little someone I know doesn't own a tie and needs one from time to time, so knowing me, it is quite possible that it will come out of the "gift stash" at some point throughout the year. We will see how it goes.
If anyone else wants to play along, we can help keep each other inspired. Feel free to leave a comment on any posts to share what have planned and/or what you are working on. Happy crafting!
Linking up with: Fiber Arts Friday over at Wisdom Begins in Wonder
Tuesday, 14 January 2014
Introducing the Pod Collection
Wow, that was a longer break than I had expected - partly because I kind of felt that I had nothing of note to share. You see, I was hoping to share the beginning of my Pod Collection, but I've had a few mishaps along the way...so instead of showing the finished products for all of them, some will be photos of the initial stages. Here we go:
#1: The Pansy Pod...not sure why I call it that, because really I see it full of violets in the spring.
#2: I call this one William...Mr. William Power - it's a toonie pod (that's our $2 coin, for those of you outside of Canada) that you have to smash to get your savings out. I estimate it can hold about $1000.00 when full.
#3: The Daffodil Pod: It seems I always make the vases with spring flowers in mind, but I think this pair would look great with a single large hydrangea in each one.
#4: Luminaria pods...the one on the right sold before it was even glazed (although I did glaze it) and I see many more of these in the future. There is a whole in the back to slide in a tea light.
#5: The salt pig...unglazed on the inside to absorb moisture, glazed on the outside for easy cleaning. I think I want to make little tiny clay spoons for the next ones I make, unless I can find some little wooden ones for a reasonable price.
#6: The Pitcher Pods...these two met with disaster. When test firing my first batch of glazed pieces in my "new to me" kiln, the cone racks on the top two shelves exploded and hunks of clay stuck to all the pieces on those two shelves. These are now in my "to be smashed for a mosaic" pile. I will be making more but sometimes it's hard for me to remake something I have already done. I have to wait for the mood to strike again.
#7: The First Birthday Pod...inspired by river rocks. I have actually found little beeswax birthday candles to fit these. I picture this becoming a great tradition in some families...using the birthday pod for every birthday, or really any special event for that matter.
#8: The soup and sandwich pod...this one was in the same glaze load as the pitchers. There were actually 2 plates and two bowls, of which only one bowl remains unaffected. It looks lonely by itself, but it's in the Carlisle shop none the less. By itself it looks like a change bowl.
#9: The pen/pencil pod...As yet these are unglazed because I'm not sure what to do to them.
#10: The Candy Dish Pod...N wants one so so so badly. I told him I will have to finish these for my next show, but that maybe, just maybe I would try to make another. The child likes the pods as much as I do. He already has a toonie pod, and a candle pod.
My plan is to make 52 different pods, hopefully with a good variety by April when my next round of shows start up again. They are kind of addictive. Every time I make one, I come up with another.
So, honestly...I could use some input. I like them personally (a lot), but are they a little boring for most tastes? I had originally planned to glaze them all in white, but some of them seem to cry out for colour. I am trying to imagine them set up all together for a show...mostly white with the occasional pop of colour? All neutrals, like the river rock inspired candles? Feel free to leave a comment if you have a suggestion.
And just in case you were wondering...this is what the "explosion" looked like. Yikes.
Linking up with: Keep Calm Craft On over at Frontier Dreams
Monday, 9 December 2013
Winter Art Market
I participated in our local Winter Art Market on the weekend, and if you are not too bored of pottery pictures yet, here is another round:
I love using these cubbies my husband helped me build for the smaller items. It helps during set up, because I just have to plunk one thing in each section, but it also helps the smallest pieces from getting lost on the table.
This was my first time ever being in an end booth, so I took one of the cubbies off the table to put on the side so that I didn't have just a big blank white space. See the lamp there? Four of us (vendors) in the room I was in went home to get a lamp because the area we were in was very dark. The ceilings were low, the lights behind us didn't work (heck some of the outlets didn't even work) and we couldn't see our items. Note to organizers: if you are hosting an event like this, please make sure you have adequate lighting!
My new pendant / gift tag display. It is a long linen tube that has a sand bag in the bottom and then is stuffed with wool. It takes up WAY less space on the table than spreading the pendants all about, and quite frankly, I just about sold out of pendants, so I think it did it's job.
This is for A. This is the size of my new tiny tumblers that I am planning for the children's tea sets. They are probably about 2 1/2" tall or thereabouts.
I love using these cubbies my husband helped me build for the smaller items. It helps during set up, because I just have to plunk one thing in each section, but it also helps the smallest pieces from getting lost on the table.
This was my first time ever being in an end booth, so I took one of the cubbies off the table to put on the side so that I didn't have just a big blank white space. See the lamp there? Four of us (vendors) in the room I was in went home to get a lamp because the area we were in was very dark. The ceilings were low, the lights behind us didn't work (heck some of the outlets didn't even work) and we couldn't see our items. Note to organizers: if you are hosting an event like this, please make sure you have adequate lighting!
Have I shared my apple blossom platter yet? I love the way it turned out.
And for once I am sticking to my decision. This pair of pods (I call them the daffodil pods, because I can't wait to plunk a little bunch in each of the vases) will NOT be separated - at least not by me. They just look lonely when they are not together. My new pendant / gift tag display. It is a long linen tube that has a sand bag in the bottom and then is stuffed with wool. It takes up WAY less space on the table than spreading the pendants all about, and quite frankly, I just about sold out of pendants, so I think it did it's job.
This is for A. This is the size of my new tiny tumblers that I am planning for the children's tea sets. They are probably about 2 1/2" tall or thereabouts.
Candle cups were the item of the day. I think I went home with three.
I met the most fantastic vendors this weekend. So many I have never seen before. I collected business cards and there is definitely some networking in my future.
How was your weekend?
Tuesday, 3 December 2013
The First Kiln Firing!
About a month and a half ago, I bought a used kiln. Yesterday was the test run on it, so I thought I would share the experience. There is a learning curve for sure.
I bought the smallest standard size kiln, but there was still room for a whole box of mugs (filled with the smallest pods in my new series - more on that in the coming months. I plan on having 52 pods by the time I am all done - one per week)...
I thought I had made PLENTY of pots to fill it, but I still had some room left, so next time I will be sure to make even more.
I also need to get some shorter posts. I have 3", 4", 6" and 10" but it looks like I should get 8" posts as well because I had a fair bit of unused space in the first layer. Either that, or make sure I make some tall pieces.I bought the smallest standard size kiln, but there was still room for a whole box of mugs (filled with the smallest pods in my new series - more on that in the coming months. I plan on having 52 pods by the time I am all done - one per week)...
...a box full of pods...
...one of my new favourites - the soup pod...
...imagine the rather large layer of cheese you could put on this bowl of French Onion Soup!
...and my second antique reproduction. This one is a reproduction of a glass platter that came from my grandmother's house. I thought it would be fun to replicate it (and I love it, so there may be many more of this in the future). I just haven't decided if I want it in just one colour, or if the pattern and background should be two different colours. One more reason to make a few more and test out what I like. Oh, I'm going to LOVE having my own kiln!
There were a few other odds and ends in the kiln too. I was quite surprised by how much fit in it, especially since I ended up running it not even filled to capacity. It is going to be much more efficient than I thought - especially on the bisque firings. Looks like I better get myself some more clay.
Linking up with: Frontier Dreams for Keep Calm Craft On
Thursday, 21 November 2013
Handmade Holidays - slippers #2
S asked for a pair of argyle slippers in his stocking. I haven't been able to find a pattern that suits, so I thought these "gentlemanly looking slippers" would fit the bill if I add a little bit of a diamond pattern on top.
Just like slippers # 1, these are acrylic...but that's because S does.not.like.wool. (Wha???)
I plan to use some black and white to add in a diamond/argyle pattern outline on the flat panel on top, but for now, they are in the Christmas bin until I finish up a few other projects.
Just like slippers # 1, these are acrylic...but that's because S does.not.like.wool. (Wha???)
I plan to use some black and white to add in a diamond/argyle pattern outline on the flat panel on top, but for now, they are in the Christmas bin until I finish up a few other projects.
The pattern is available as a free download on ravelry
but I originally found them over here on Pinterest, of course.
This is exactly how I will make my own pair when I'm all done with the Christmas knitting.
How are your handmade holiday projects coming along?
Wednesday, 20 November 2013
This past weekend's craft show.
Last Saturday, I had a booth at a craft show that was a school fundraiser for a friend of mine. As usual, I forgot to take pictures first thing in the morning, but then it got really really slow, so I snapped a few.
My mitten drying rack being used as a plate rack.
My husband cut and dado cut all the wood for the cubbies in the back, so all I had to do was assemble them. I really like how they turned out. I might get him to make me some bigger ones too. The ones in the picture are 6" x 6" and a few things are just a smidge too big to fit.
A close-up of the cubbies. I filled up the holes with packages and pinecones as items were selling so I didn't have big empty spots.
Matchy matchy things.
Did I share the octopus mug? I made it for my nephew's birthday (which was the day after the show) but I brought it along just to show something a little different.
And since it was so slow...I have talked myself into one more show before Christmas.
Tuesday, 12 November 2013
Handmade Holidays: slippers #1
I hadn't planned on knitting any slippers this year for Winter Solstice/ Christmas, but both boys surprised me by requesting some. N asked for tall slippers like the ones I made last year, but I don't have an extra felted wool sweater to cut, so I made these instead:
I first came across the image over on this Pinterest pin but it took some serious tracking down to find the actual pattern. Here is the link to the free pattern by way of The Seamen's Church Institute.
Just a note: the picture on the pattern doesn't look a whole lot like these, but they do take shape once you put them on your feet.
Happy handmade holiday making to you...
Linking up with: Keep Calm Craft On over at Frontier Dreams
Fiber Arts Friday at Wisdom Begins in Wonder
For this year, sizing is pretty easy, since both boys' feet are almost exactly the same size as mine.
Next year...who knows.
I have a feeling these will be called "Nanaimo bar slippers".
They are knit flat and then seamed, an easy process and they have been knit for a week or so but I couldn't find some sneaky time to seam them up. I just finished last night. For all you experiences knitters out there - I am sure you can tell these were done in acrylic. *Gasp*. There's a reason for that...N is notorious for throwing his handknits in the laundry bin along with everything else even though we have a bag for woolens. I first came across the image over on this Pinterest pin but it took some serious tracking down to find the actual pattern. Here is the link to the free pattern by way of The Seamen's Church Institute.
Just a note: the picture on the pattern doesn't look a whole lot like these, but they do take shape once you put them on your feet.
Happy handmade holiday making to you...
Linking up with: Keep Calm Craft On over at Frontier Dreams
Fiber Arts Friday at Wisdom Begins in Wonder
Monday, 11 November 2013
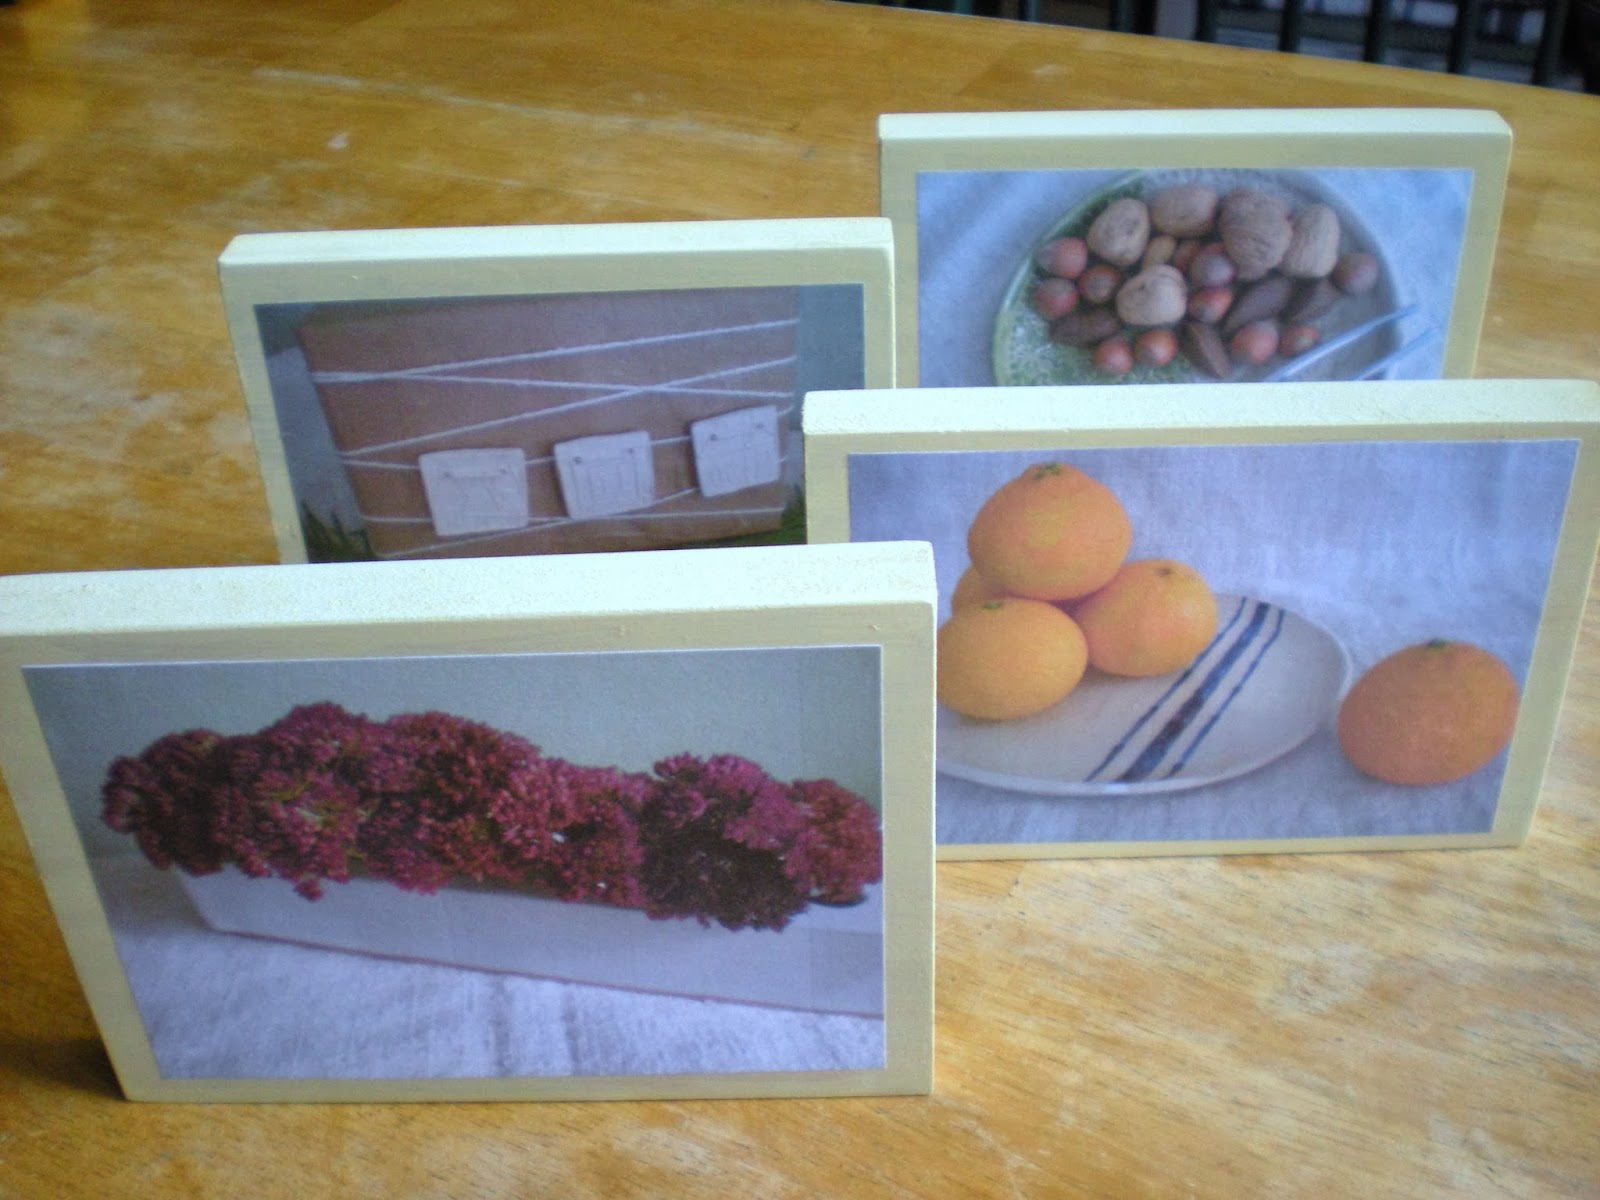
Craft show prep - photo blocks
When I do a craft show, if I don't have the space to display one of these vases with flowers in it:
like this:
then people always ask me what it's for (especially if it is the last one left on the table).
So, in preparation for the next show (which is in a mere 5 days), I made this little picture block to display on the table in case I am busy with another customer...
and because I thought it would look a little strange all by itself, I made a few more:
They were super quick and easy.
I just printed off a few colour photos onto plain white printer paper, and laid them out on some scraps of MDF leftover from a project at my parents house.
I marked the approximate places to cut the boards, gave them a quick coat of craft paint,
then a coat of Modge Podge.
I added the picture while the Modge Podge was still wet, rubbing out all the air bubbles with my finger.
And then top coated it with another layer of Modge Podge.
Easy Peasy, and they will start to fill in little gaps when things (hopefully) sell from the table.
I think this little idea would be so flexible for all kinds of craft booths, and they will also serve as a reminder of what I need to make again...I often forget to take pictures of my items before I sell them.
And unrelated, the biggest bowl I have made so far. It's a 5 pounder - wheel thrown. Not too shabby, I think, since I'm usually a hand builder.
Subscribe to:
Posts (Atom)