Thursday 26 January 2012

Felting

Our cat does not play with cat toys.  Instead, he steals balls from the boys' rooms, plays with them, and leaves them all over the house.  So N thought maybe Hobbes (the cat) needed something of his own to play with.
Wool felt balls in various stages of completion.

A few years ago, a kind farmer friend I know let me have a whole huge sheep fleece.  I spent an entire summer washing, and picking and cutting the pieces I could salvage so that I could try my hand at dying the wool with plants growing in our yard.  Now, this fleece isn't good enough for spinning (something I have tried a tiny little bit, but plan on doing some more this year) but it is fantastic for stuffing things, and I thought we would try some felting with it.
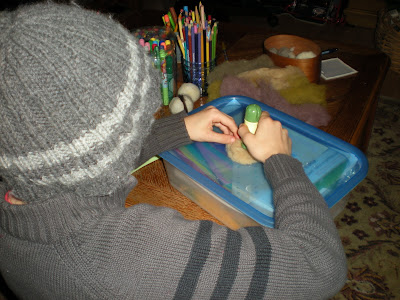
Carding...this took two nights due to attention span issues :)
This picture was not, in fact, posed.  The cat kept following us wherever we moved the fleece to.  And laying down on it, beside it, eating it...you name it.  That big cheese box in the back...that's what I keep my fleece in.    
What?  People don't keep their fleece in a cheese box?  :)
We both did a bit of the needle felting to get the fleece into a rough ball shape, and not so loose.  This is our first real attempt at felting so we were kind of testing things out as we went along.
We moved on to wet felting.  The tutorials on the internet said to alternate hot water and cold water and use plenty of dish soap. So that's what we tried...note: this plus a nine year old makes a mess...a happy mass, but a mess none the less.
Make sure you get plenty of lather going...
...put your hands in this very essential formation...
..and blow very gently.
This is a very important step in the wet felting process.  It must be, considering the amount of time that was spent on this step alone.

Which is why, only two balls are felted, and a few are partially felted, and at least one..not at all felted.
Good thing we have time on our hands.

I just turned around and the cat has made off with all but the largest unfelted ball.  Hmmm.  He has been playing with the two finished ones for a few weeks.  They are a big hit.

Join along with Linda at Natural Suburbia for Creative Friday, and 
Andrea of Wisdom Begins in Wonder for Fiber Arts Friday.

Today I am thankful for:  our lovely town library...I got quite the haul this week, and projects lined up.  

Wednesday 25 January 2012

Oatmeal Chocolate Chip cookies

A family recipe:

Ingredients:
3/4 cup butter, room temperature
1 1/2 cups brown sugar, not packed
2 eggs
1 tsp vanilla
2 cups flour (I use whole wheat, but you can use whatever)
1 tsp baking powder
1/2 tsp baking soda
2 cups rolled oats
1 cup chocolate chips
1 cup coconut
you can add pecans or other nuts if you wish...and I have also added wheat germ before and you can't tell it is in there...oh, and I have added up to a cup of dried cranberries without a problem.

Cream together the butter and brown sugar.  Add eggs and vanilla.
In a separate bowl, combine flour, baking powder, baking soda, coconut, and rolled oats.  If you are adding wheat germ, add it here.
Add the dry mixture to the wet mixture and mix until well combined.
Add whatever "stuff" you are adding in...dried fruit, chocolate chips, nuts...make them yours, right?
Mix until well combined.
Drop by the spoonful onto a cookie sheet lined with a silpat liner.  Bake at 350 for 8 to 10 minutes, or until they are firm enough for your taste.  (Please note:  I always check them at 10 minutes, and I always put them back in for a few more minutes, as my oven is "wonky" at 350...I usually regret the last minute or two.) Cool on sheet before removing to a rack.
Also note:  I made 40 cookies from the recipe above, with another roll of dough in the freezer that will probably make 24 or so.  This makes a good size batch of cookies...so feel free to make a half batch :) 

Have you met me?  I don't do the half batch!  Cookies will be my downfall.
Enjoy!

Today I am thankful for:  my cold starting to disappear.  I can see!  I can breathe! woo-woo!  A few more days and I should be right back to "normal".


Thursday 12 January 2012

Cast iron pan handle cover

I am joining several people with today's post...I will link at the bottom.

First up:  Stash-busting.
This piece of wool from an (accidentally) felted sweater was in my stash, and has been for a few years.  I have used most of the rest of the sweater but I have a few pieces left.  I fished out the smallest ball of wool yarn I could find, and voila!...
 ...a handle cover for my cast iron skillet.  And since this was quick, and I have more than one cast iron pan...
...I made a few more.  I know that since these pans have been around for years and years (I'm sure all our grandmothers and great-grandmothers had them) that I am not the first person to ever come up with this, but it felt pretty darn good to make something so useful and quick with what I had sitting around.  I just rolled up the sweater piece so that there would be two layers top and bottom, and blanket stitched around it.  Easy, peasy, and kind of cute, no?