Thursday, 28 March 2013

visit to the art gallery

Better late than never, I suppose...the pictures from our visit to the art gallery in Toronto during the boys' March Break.

It was very interesting.  I hadn't been to an art gallery in years, and the boys have only each been once or maybe twice with class trips so I wasn't sure what to expect from them.  We ended up staying for 3 hours, and here are some of our favourites from the day:

 We started in the lower level, with the scale models of all different types of ships.  These were some of my favourites - turns out the ships the boys picked didn't show up on my camera (no flash allowed - so even though I took buckets of pictures, I have several you can't see a darn thing).

This was S's favourite painting - he likes modern/abstract...so not like me in just this one particular matter!  I apologize I cannot give credit where credit is due because I forgot to take a picture of the name and have forgotten it already.
N, being a boy, chose this as his favourite piece - of course...a bathroom made entirely of mesh screening.  Ditto over here with the credit.
We were all impressed by this piece by (Kori?) Newkirk.  Look closely...
...it's made of beads strung on synthetic hair.  Amazing.
There was an entire wall of these panels covered in spear heads and other tool pieces - the boys walked right past it at first, but then came back to look at individual pieces. 

The boys loved these (even though N walked right past them the first time too - he was having "issues" with paying attention...made by Karoo Ashevak.

For myself, I discovered a new-to-me artist:  Cornelius Krieghoff.  The details in his paintings (and there were many of them) were absolutely amazing!
 He painted scenes typical of the "Canadian" experience of the times...mostly Habitants and Native Americans - in the 1800s.  Plenty of winter, fall, and stomy scenes to choose from.
 Just look at that lantern...it was maybe 1/2" tall and looked exactly like a real tin lantern (although I couldn't capture it on film).
N liked all of the pieces that had "cracking ice" in them...and there were quite a handful of them.  I was trying to capture individual parts of the canvas rather than the whole piece at once...the costuming and details were so intricate-and the subject matter was right up my alley.  His focus was on everyday life.

On the whole, I was impressed with the gallery, and quite frankly I was surprised by how long we stayed.  I will be looking into more of that type of outing with the children in the future. 

Monday, 18 March 2013

Casa Loma

Last week was March Break for the boys, so we decided to go on a small adventure.  We went to visit my sister in Toronto for a couple of days.  One of our stops was Casa Loma...a "castle" built in the early 1900's as a private residence right in the city.

See that wall surrounding it?  The owner at the time paid farmers $1.00 per rock they brought in for the wall.  Quite a nice price for the times I would think (1911).

Although it is decorated and furnished in the style of the times (mostly, more on that later), almost all of the pictures I took were of the background:
 
 The library ceiling.

 The library ceiling in detail.
 
 The dining room ceiling moulding...
 ...and in detail.  Can you imagine trying to find an artisan that can still do this kind of work?
 The serving room ceiling.

 This picture does NOT do it justice.  This is the dome stained  glass ceiling of the conservatory.  Hanging from the dome are glass clusters of grapes.
 Details, details, details.  The bowtie shape in the great hall floor...put there so the boards can't shift sideways.  Where is this kind of workmanship any more?
The great hall ceiling.  One of my son's favourite parts of the castle.  This one was taken from the "Master Bedroom" balcony.

And, of course, random pieces of furniture that I liked:

 The desk in the "Master Bedroom".
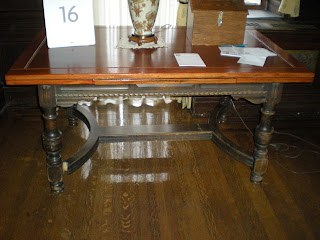
 The bottom half of this table at the end of a hall.
 The curved pieces between the legs on this little table.  Nobody takes time for details like this any more.  Sigh.
 The trunk and little table in the only room that was labelled as the servant's room...more on that to follow.
 Also in the servant's room.

It was built for entertaining military, business, and social contacts in grand style.  Now, here's the thing - I spent the entire time that we were walking through it tryng to see it as it would have been, not as it is currently set up.  When you enter, you are given a map, with the individual rooms labelled.  On the third floor, I finally found the blueprints on the wall of what the rooms were when the house was in use.  I so so would have liked to have seen it set up as the blueprints showed.  The whole servants quarters were being used as offices and storage -except for the one room set up as a guest suite.  Being a devoted follower of "Downton Abbey" and the new version of "Upstairs/Downstairs", I want to see the servant's quarters.  Also, most of the family bedrooms have been set up as sitting rooms, more offices, and a war museum.  In the basement, where the kitchen would have been - they have a gift shop and little cafe.  I would really have enjoyed seeing the kitchen set up as it would have been back in the day.  In fact, I think setting it up as it actually would have been would actually draw more tourists.  But then, that's just my opinion.
Stay tuned for part two of our adventure...the art gallery.

Wednesday, 6 March 2013

A one-piece Log Cabin "quilt" block

For some time now, I have been meaning to try my hand at making a knit quilt block with some of my left over bits of yarn.... a one piece quilt block that I wouldn't have to sew a million seams on.
Ta-da.  If you knit it in cotton, I think it would make a great dishcloth.  If you knit a bunch of them, you could sew them up together to make a scarf or a blanket.  If you continue on with the pattern, you could make a crib sized log cabin block without having to sew all those pieces together...

So, without further ado...the pattern:

-I used Bernat Satin worsted weight yarn because that's what I had to use up.  One ball of each colour will make several blocks, or you can use just one colour, or you can just use up little scraps.
-4mm needles- 2 for knitting and a few extras for holding the stiches while you work the next section
-One each 2", 3" and 6" stitch holders
-Gauge:  12 stitches and 24 rows in garter stitch is a 2" x 2" square.  Gauge is not terribly important unless you plan to make a blanket...then you just want to make each square the same size.

Cast on 12 stitches of colour A.
Knit in garter stitch for 22 rows.  Break yarn.
Continue knitting in garter stitch, using colour B, for 12 rows.
Transfer all 12 stitches to 2" stitch holder.
Turn work counter-clockwise.  Pick up 18 stitches along right side of work, starting with 6 stitches of colour B and then 12 stitches of colour A, as below:
I used a larger stitch holder in this pictureUse whatever size you have for the small pieces.
Note:  It is important to pick up the stitches in the correct direction to make sure the colour changes appear on the back side of the work.  Although you pick up colour B first, you will knit the colour A stitches first.
  
This is how the colour changes will appear on the back of your work.
 
Note 2:  If you are making a block in one solid colour, reverse the directions as the colour change will not affect your piece, and you will have fewer ends to weave in, if any.

Knit the 18 stitches you picked up using colour C and continue knitting in garter stitch for 12 rows.  
Break yarn.
Transfer the 18 stitches of colour C to a 3" stitch holder.  Turn work counter-clockwise.

Pick up 6 stitches along the edge of colour C and 12 stitches of colour A as shown below:
Knit using colour D, in garter stitch, for 12 rows.  Break yarn.
Transfer the 18 stitches to a stitch holder.   Turn work counter-clockwise.

Pick up 6 stitches of colour D, 12 stitches of colour A, and 6 stitches of colour B.  Knit the 24 stitches in colour E for 12 rows of garter stitch.  
At this point, I stopped transferring the stitches to stitch holders because I ran out of them, quite frankly.  I had extra 4mm needles, so I just left them in place to hold the stitches as I continued working.  Use whatever feels best for you.
Turn work counter clockwise.  Pick up 6 stitches of colour E, transfer the stitches from the stitch holder to your knitting needle, and then pick up 6 stitches of colour C.
Knit 12 rows in garter stitch of desired colour.
Continue along in the same manner until your "quilt block" is the desired size.  The instruction that follow are for binding off an 8" square.
Binding off:  Using the yarn you choose for the border, bind off the 48 stitches of the last row (the row currently on the needle) leaving the last new stitch on the needle to use in turning the corner.
Turn your work clockwise and pick up 6 stitches from the top edge (as pictured on the top needle, above).  Bind off the 6 stitches and then continue binding off the rest of the row (if you are using a stitch holder, you will have to transfer the stitches to a knitting needle to bind off).
 
Turn your work clockwise and pick up 6 stitches.
Bind off those 6 stitches and continue binding off the rest of the row.  Repeat for the last side of the block, picking up and binding off the last 6 stitches to complete the border.

 On the back side, weave in the ends as neatly as possible.  


 The ends should just about disappear.
 Now, why not make a few more to make up a scarf?  Or a "quilt"? 

Linking up with:  Yarn along at small things
                          Stash Bash at Crunchy Catholic Momma
                          Permanent Homeskills linkup at the Backyard Farming Connection
                          Home acre hope # 9 at the self sufficient homeacre
                          Eat Make Grow at Pocket Pause 
                          Fiber Arts Friday at Wisdom Begins in Wonder
                          Creative Friday at Natural Suburbia

Monday, 4 March 2013

What I'm eating...

I very much enjoy sushi (although not with fish, raw or otherwise) and we do sometimes make it at home when the craving strikes, but let's face it --- rolling enough sushi for a family is quite time consuming.

Enter...
...the sushi bowl. 
Sticky rice (1 part rice to one part water, bring to a boil, cover, reduce heat and simmer for 10 minutes, turn off the heat and let it steam with the lid on for 20 minutes) ---
with sushi rice seasoning (for 2 cups of rice I use 1/4 rice vinegar, 2 tbsp sugar, 1 tsp salt - heat until dissolved, pour onto sticky rice and cool) ---
and then everything I would normally put into the sushi, except it is cut into bite sized pieces.
I serve it with edamame, and I try to always include a bit of protein...shrimp, "crab", leftover roast beef or pork.  The fun part is I chop up all the toppings and everyone makes up their own plate with what they want.  N and I also scoop some onto squares of seaweed.  No complaints (gasp).

As you can see from my plate...we have had to revert back to much less seasonal eating for the remainder of the winter.  Although I am still trying to buy local produce (the peas, peppers, and mushrooms) we are clearly also eating imported food (it really is a shame I can't grow avocado, mango, etc) to get some variety.

We are on our last jar of jam.  All of the "good" pickles are gone and we are down to the jars of jalepeno dills I made for my husband.  It seemed like a lot by the time I was done canning last summer, but I have a better idea of how much we will need this year.  Herbs, I still have a-plenty! and there are still berries in the freezer, although not too many.  For the "eat what you grow/grow what you eat challenge" we are down to about 5 days a week instead of every day.  There is room for improvement...and so we shall try...

What are you eating this week?

                         The Backyard Farming Connection
                         Eat Make Grow Blog Hop at Pocket Pause