Monday, 27 May 2013

Graduation Prep - Part 2

 I thought it would be fun for the kids to have a kind of DIY photo booth available at their graduation...
 I had an old gold frame in the basement that we have used for the art show a couple of times, and just spray painted it black with leftover paint from one of S's school projects.  By the way...meet N (he's not the one graduating, obviously).
I made a giant pinwheel for one of the props. I used a 12" x 12" piece of card stock and "borrowed" some spray adhesive from work to attach some gift wrap to the back of it.  I actually used a nail to pin this one shut - with glass beads to act as a kind of "stopper" and then nailed it to a giant skewer.  Inspiration for this one comes from a picture I found on pinterest - which happens to come from etsy.  I figure it is OK to copy the idea since it is for personal use and not to sell, but the link goes to the etsy shop.
I made these Batman style thought bubble type things and couldn't resist adding the Bazinga.  The inspiration for this is also from Pinterest.  I just drew them freehand onto some file folders (raided from the school's supply cupboard) and wrote the letters on with black permanent marker.  I may add some glitter to the outline if time permits - but for now, I'm calling these done.
 Mustaches on a stick seem to be all the rage, and although you can buy these pre-made at plenty of party supply stores, I used some card stock from my stash to make these.  They are just hot glued on to kitchen skewers.  You can draw these out yourself, copy them from cartoon characters, or google free mustache clip art to get plenty of options.  I did a combination of the three...
...and lipstick for the girls.  All of the props-on-a-stick will be displayed in a small bucket filled with sand so they stand up nicely.

All of these above will only work if two people are in the frame together, each holding one side and one prop, so for individual shots, I bought a couple of hands free props:
 Some sequined masks...
...and some giant glasses and feather boas - they are only 13 years old after all.

I still have to come up with some sort of backdrop, but that will have to wait until I see the actual room they are using - the school rented a hall, and I haven't had a chance to go check it out yet.  The tablecloth will come from the school...one of the cloth ones I made a few years ago in school colours.

Oh, I almost forgot...the tally:  the frame was free, as were all of the props on a stick.  Total cost for the photo booth: between $6.00 and $10.00 because the glasses, boas and masks came from the dollar store but some were over a dollar.

From a couple of the comments on part 1 of this series it occurs to me that I should clarify...the decorations I am making are not for an at home party...they are for the school's actual graduation ceremony.  I'm just helping out.

I'm currently working on the centerpieces, so part 3 should follow next week...

Linking up with: Homemade Monday on Frugal By Choice, Cheap by Necessity
                         Keep Calm Craft On over at Frontier Dreams 
                         Creative Friday at Natural Suburbia

Thursday, 23 May 2013

Shop Update - the buttons are listed!

Months ago, I posted a picture of some in-the-works pottery buttons and I said I would share the pictures when they came out of the kiln.  Well, I hadn't gotten around to it until now...so, without further ado...the first batch of buttons:
The top ones are jumbo, over-sized buttons (1 3/4" roughly), and all of the ones below are around 7/8" to 1".  I have finally gotten around to listing my first batch of buttons over in  my etsy shop.  Feel free to go on over and have a look.


I love the process of making these...kind of feeds my OCD-like tendencies.  Now, I'm just wondering what people will think of them, and whether I can justify making some more.

Linking up with:  Creative Friday at Natural Suburbia
Keep Calm, Craft On over at Frontier Dreams 

Wednesday, 22 May 2013

Alpine Strawberries

I have several alpine strawberry plants growing in the yard, and although I very rarely get to actually eat one of the fruits before a critter takes off with them, I still dedicate space to them in the garden.  I came very near to ripping them out a few years ago before I tried drying the leaves for tea.  The leaf of wild strawberry and alpine strawberry plants are reportedly "good for convalescents and children".  We ran out of these tea leaves months ago, so I am going to try to harvest more this year.  
This is the alpine strawberry.  Note the leaves are shaped differently than the regular strawberry plant pictured below. The fruit is tiny and is said to be good for sunburn, but I have never tried it.
 Regular strawberry.
I snipped one leaf off each plant that was big enough to steal from, and laid them out on an old screen for drying.  It doesn't look like much of a harvest, but if I do it every week or so, hopefully I will have enough leaves to last the winter.

Oh, and the "good for convalescents and children" bit?  I add this leaf to the herbal tea blend every time the boys or feeling not quite right.  It does add its own (quite tasty) flavour to the blend.  I also add it to our iced herbal tea blend when I have enough.

Do you have a favourite herb for your tea blends?  I am always looking for new additions.

Linking up with: Wildcraft Wednesday over at Mind Body and Sole
                      Waste not want not at Poor and Gluten free a new-to-me website that looks quite  interesting
                      From the Farm blog hop #34

Tuesday, 21 May 2013

Graduation decorations - part 1

My oldest graduates from elementary school in just over a month and I have been hard at work getting things ready for the graduation.  I thought I would share some of the (very low budget) decorations as they could work well for any party, really.

Today: the cake table...
 I have been making multiple garlands to hang on the wall behind the cake table, as well as on the front of the table cloth so that the cake table will look more interesting from far away.  I printed huge letters on the computer (Times New Roman font if I remember correctly) and then cut them out from card stock and threaded them onto some butchers twine.
Then I tied a whole bunch of ribbons, tulle, fabric scraps and seam binding onto the twine.  Total time:  maybe half an hour?
I usually try to avoid the dollar store so that I am not tempted to pick up extra "stuff" but I do tend to go there when I need inexpensive craft supplies for an event at the school.  I was able to pick up bags of mini pom-poms, sorted by colour in each bag, for $1 a piece.  Each bag made one garland about 6 feet long (or so).

 Total time for each pom-pom garland: 15- 20 minutes - but it's fun and you can do it while checking over your kids' homework or something.


I also made a paper garland using squares cut from one of the "too-damaged to sell" books from the used book sale and some wrapping paper that I bought for the centerpieces.  Pretty self-explanatory from the pictures, but you just lay down a large square, squish on a blob of tacky glue, lay your twine over top, and then add another square over that.  I ended up gluing squares to the back too, just in case it tries to flip all over the place when hung on the wall - so I don't end up with a whole row of blah squares.  Total time:  probably close to an hour counting cutting and gluing time together.

The last garland is made of triangles of bristol board that I got from the school's supply room.  They are sewn on my sewing machine using the basting stitch.  I cut 4 2" strips from each colour of board and it made So.Much.Garland!  Note: use quilting thread or button thread for this one - and you will have to play around with the tension on your machine.  Total time for meters and meters of garland: probably 45 minutes.
This is a very rough sketch of what it will look like.  There will be three glass cylinders at the back of the table with a flower or a pinwheel inside and topped off with a paper lantern.  There will also be a row of small glass bottles along the back and each one will have one flower or leaf popped inside.  And of course, the cake and cupcakes.

Here's the cost breakdown:
3 paper lanterns that light up from the dollar store:  $1.00 each.
3 bags of pom-poms:  $1.00 each
The card stock, fabric scraps, glass bottles, and glass cylinders are all supplies from my house.  The flowers and leaves will come from my garden.  The bristol board was from the school.  The table cloth will be one of several I made for the school a few years back so they would stop buying and throwing away a dozen plastic tablecloths for each event.  All free.

Grand total: $6.00 - not counting the cake :)  I don't want to tally the time.

Sharing today at: Keep Calm Craft on over at Frontier Dreams.
                          Ecokids Tuesday at Like Mama Like Daughter
                          Creative Friday at Natural Suburbia
                          Fiber Arts Friday at Wisdom Begins in Wonder -because a couple of these are fiber-ey, and heck...I like to join in on that one, and I have nothing else fiber-ey in the works right now (frowny-face).
                          From the Farm blog hop #34
                          Homemade Mondays on Frugal by Choice, Cheap by Necessity
                          Transformation Thursday at the Shabby Creek Cottage

Wednesday, 15 May 2013

Another, lighter sign

 
If you saw my post yesterday, I made a sign for upcoming craft shows...you know - to make my booth look at least a little bit the same from show to show.  I decided I needed a lighter one too - a sign that can be attached to my tablecloth or even hung on a wall behind my booth (ahh, the magic of duct tape).  I still need to iron it, obviously.

I put a piece of fabric on top of yesterday's sign and traced out the wording with a pencil.  Then I used a permanent marker to fill in the lettering.  ***I wanted to test out if I'm going to like this in my set up before investing the time to stitch one or quilt one - in hindsight, though, I don't know if the permanent marker will last or if it will just eat through the fabric***
I didn't have any interfacing, or quilt batting on hand...but I did have some felt.  Two layers are sandwiched in between the front and back of the sign.
I pinned the front and sewed it on alone so that I could make sure the writing was straight and centered.  Then I folded the edges of the back piece down and sewed in the groove to attach it on after.

It thought about adding grommets, or ribbons on the back for hanging it, but I decided not to add anything at all for attaching as I will probably be safety pinning it to my tablecloth.

The scraps I used (I cut up an old curtain liner) just happen to be almost the same colour as the paint on the wooden sign so I will be comfortable using both together or alternating them out depending on the situation.  Cost for sign #2:  also $0.00 - it's built of leftovers.

Do any of you do craft shows or have a market stall?  I'm wondering how other people display their brand.  Feel free to leave a link in the comments if you have one you would like to share.

Tuesday, 14 May 2013

Preparing for craft shows - Branding

I've decided that if I'm going to start doing more craft shows again, that I want to do it better this time around.  I've decided I need to do some "branding" so that people can recognize my booth from one show to another.  My first step was to make this sign...I had painted a scrap piece of wood to prop up on risers for a "second level" at my last pottery show, but it didn't really work as well as I thought it would.  So, in the interest of reusing things I have...I printed out my name (Edwardian Script is the font) as big as I could onto scrap paper, traced it with a pen to scratch it into the wood, and went over it with a permanent marker.  This has been on my to-do list for a while but I just wasn't getting around to it because I'm not that good with a paint brush.  Permanent marker made the job so so much easier.  I think this would work well for a market stall too, or a road side stand.  Total cost:  $0.00, since I had all the materials I needed.

Do any of you have some "branding" tricks for me that you are willing to share?

Linking up with: Keep Calm Craft On over at Frontier Dreams
                         Backyard Farming Connection, for the hop

PS:  For family who haven't been to my house in a while, that's the new paint colour in the front hall, up the stairs, and all the way down to the end of the upstairs hall.

Thursday, 9 May 2013

Elementary school art show

For the past 4 years, the school has hosted an art show where all of the projects are made of recycled/repurposed/waste materials.  This year, it was a tight squeeze getting things done in time with the teacher's "work to rule" but it did happen after all.  I thought I would share some of the favourites.

First, some of the class projects:

 The grade 2 class made this wooden sculpture from scrap wood.  Each student took a turn attaching a piece at a time until it was finished.  From one side, it looked like a castle, from one side - a treehouse, and from one side - a sailboat. 
The kindergarten class contributed this wall art - it's made of some of their old art work, construction paper scraps from other classes and other bits that were in a box of scrap paper.  Most adults really loved this - I heard one say she would like to do something like this in her living room all in blues and greens.

The special needs class made these awesome puppets.  These were one of the biggest hits of the show.  The heads are made of leftovers from casts (the school is across the street from a hospital) that aren't used any more.

 For years I have been trying to get teachers to use the art show as part of their curriculum - not just art.  This year, the grade 5 teacher decided that the students should build models as part of their "Ancient Egypt" unit.  I love the pyramid in the bottom right corner made of brightly coloured cereal boxes...and you can't read the sign, but it says it is made by "Hunter the Great".  So awesome.

And for individual projects, some absolute gems:

This apple made from 2L bottles was brilliant! Grade 3 student I believe.

One of  the teachers made this paper sculpture from leftovers.  We can always count on her for a great origami project.
My nephew made this cardboard mounted deer head.  Lovely.
This one was intriguing.  It was a paper honeycomb sculpture inside the branch and hanging all around it were little bees made from greeting cards.  Everybody touched it.

And of course I have to include my boys' projects...S made the woven rug on the right.  It is made from cut up T-shirts and took him quite a while.  He keeps it ON his bed, so the cat will go sleep on it.
N made the felted mat and ball on the left.  We went to an open house at an alpaca farm last spring and he was horrified that they throw out the leg fiber when they shear them.  They gladly gave him a bag full which he felted, in the tub, with his bathing suit on, into this mat for the cat.  The cat loves it and it is keeping so much cat fur off our area rug.  There are plans for more of these.  The sad thing is that during the art show, he caught a group of kids trying to rip the yellow 'circles' off the top - hence, the kinda sad state which you may or may not see in the picture.

So, all told, the art show was a success.  We had more participation than ever before (I was so busy I only got pictures of a few of the projects) and there is even already talk about what to do next year.

Linking up with: Creative Friday at Natural Suburbia
Fiber Arts Friday at Wisdom begins in wonder because the boys' projects are all about fiber!
Ecokids Tuesday at Like Mama - Like Daughter  because this fits the hop so exactly.
homemade monday at Frugal by Choice - Cheap by Necessity 

Wednesday, 8 May 2013

Around the "farm"

The first harvest.  Oh how I love spring and the new flavours that come out one after the other.
 Crossing my fingers and hoping that we don't get a repeat performance of last year's tree fruit disaster.
 Admiring these tiny little daffodils that a creature planted for me.  I didn't think that squirrels usually messed with daffodils, but I have two little clumps of these tiny guys that I didn't plant...and I know it is squirrels I have to thank for the red tulips I didn't plant that they bring me year after year.
The boys have painted me some red rocks to mimic strawberries.  They are spread around our strawberry patch in the hopes that the birds will learn that "those red things aren't food".  Aaah, pinterest!  Here is the pin I found if you want to follow the links.
Stringing mini pom poms onto quilting thread.  It's for part of a backdrop at somebody's upcoming graduation.  There will be lots of posts on that coming in the next couple of months as yours truly is the decoration committee (that's code for "I get to do things my way").
...and playing around with some display ideas for my next craft show.  Here's a link
to information about the show and here is a link for their facebook page with last years' pictures.

What's happening around your "farm"?

Tuesday, 23 April 2013

Tiny artwork

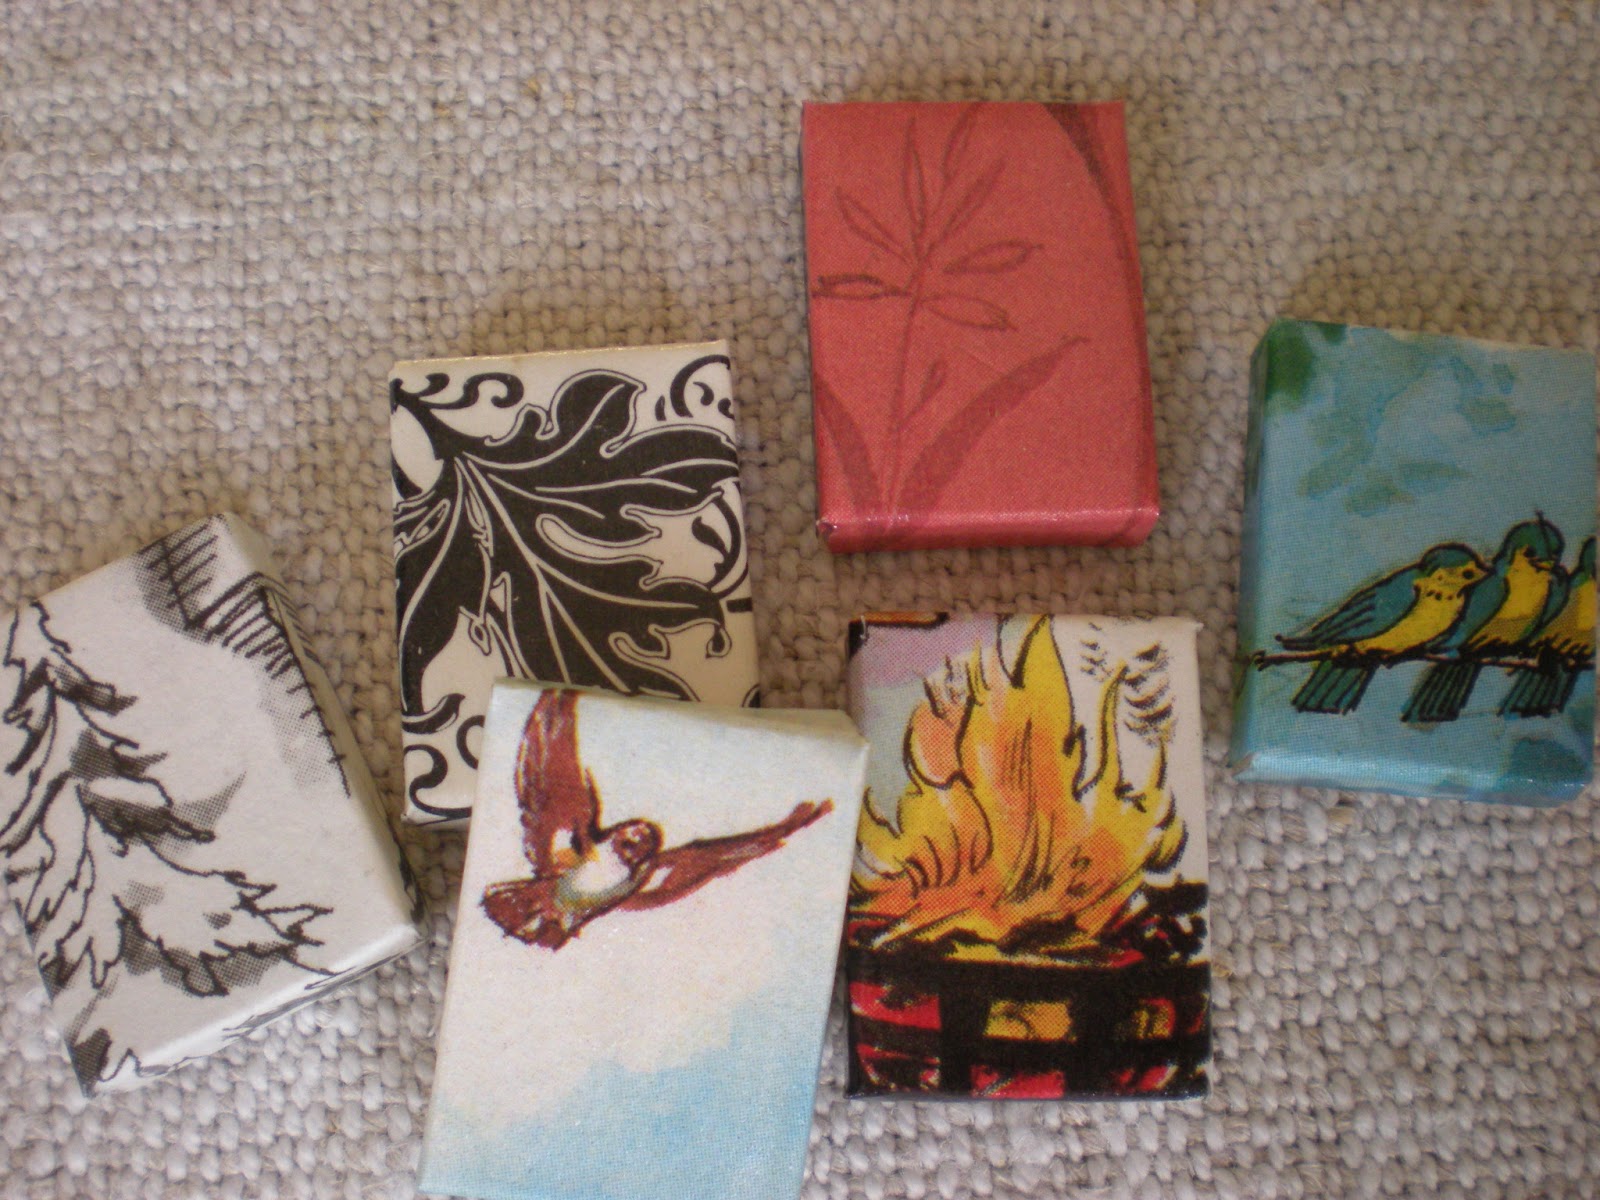
First, the background:  I am, and have been for a while, getting ready for the school's art show.  The point is for the students to make a piece of art using recycled/ upcycled materials.  Each year that I have run it, I have made name tags for the kids that are participating.  I was pretty stumped as to what to make this year that wouldn't be a repeat of the other years.


Yesterday, inspiration hit while I was sorting books for the used book sale that we are running with the art show...it always makes me sad when we get books so damaged we can't do anything with them but put them in the recycle bin...or can we?  I brought one home to play with.
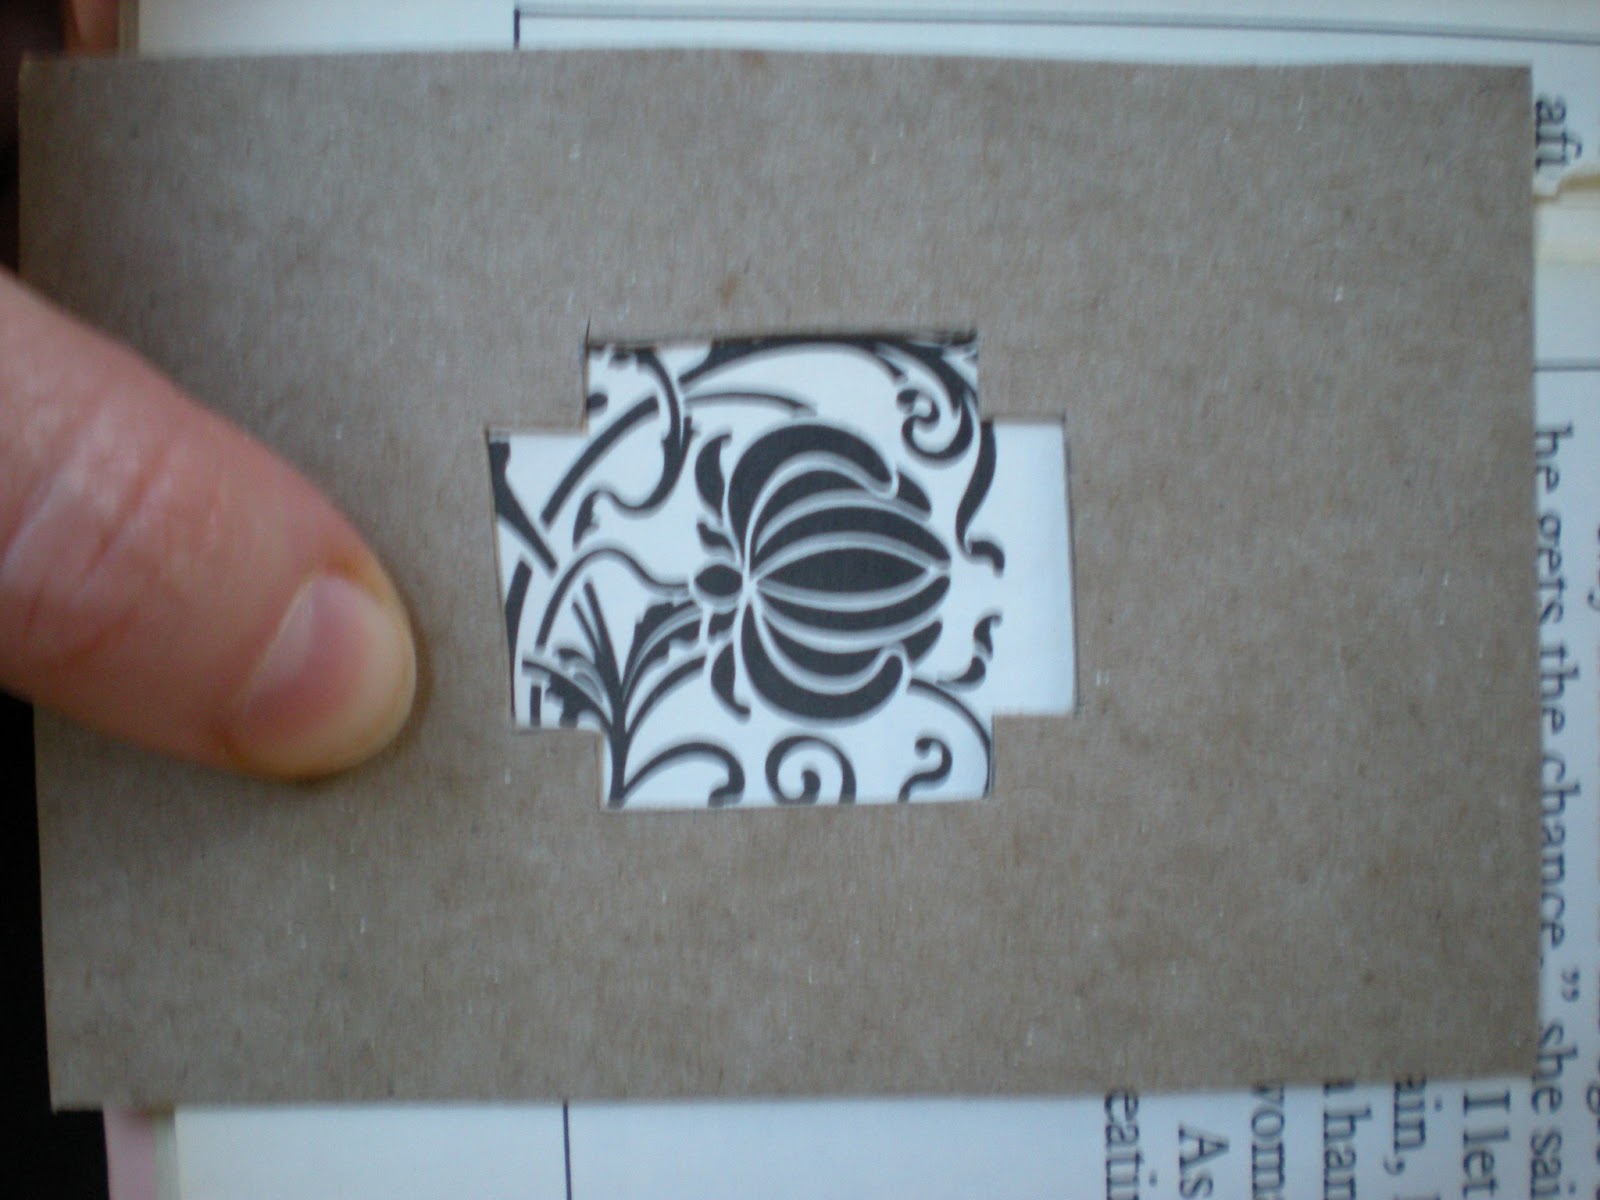
I made myself a little cardboard template (from an old tissue box) to fit these little wooden rectangles that I have (left over from a game I made for the boys...my very first blog post ever actually).  The wooden pieces were just sliced from a random piece of wood in the scrap pile...just be sure to use solid wood and not plywood or MDF.
I used the cardboard template as a little "window" for choosing the pictures to cut from the book (by the way...there were pages missing, ripped pages and the cover was ripped off - I would not normally cut from a book...just sayin).
 I traced around my little window, cut it out with scissors...
 ...glued it to the wooden tile with Mod Podge and then painted another layer of Mod Podge on top.
 I drilled a hole through the top and laced a piece of ribbon through, but I'm not to pleased with the result.  I had planned on putting the kids' names on the back with "2013" but now I think they would look better as pins.
 I made a couple...
 Every other page was colour, every other page was black and white...
 Aren't they terribly cute?
I'm going to let each child and volunteer choose their own, the one that "speaks to them" and write their name on after.  I'm about half way done (I need about 40) but I have a sneaking suspicion that there will be more of these in my near future because I think they would make FANTASTIC gift tags...personalized to each gift I make.  In fact, I have a few pictures set aside for someone I know already...

Hint: you can use the title of the stories (this happened to be a book of fairy tales and folk tales) for individual words or initials.

So, name tags almost done AND made entirely of recycled/leftover materials.  Yippee.  I hope the kids like them...I know the volunteers will.

Linking up with: Keep Calm Craft On at Frontier Dreams
                         Homemade Monday over at Frugal by Choice, Cheap by Necessity
                         Hop 29 at the Backyard Farming Connection


Monday, 22 April 2013

I'm back...a pottery update

Some of you may have been wondering where I have been lately...
 I was getting ready for my first pottery show and sale as a member of the Sarnia Lambton Potter's Guild.
 Oh my goodness, it was so much fun...I want to do it again and again...
...but when I showed up, my table was looking rather picked over...so now I need to/get to make some more.  Yippee!

This little friendly guy is Jack...he lives at the greenhouse where we had our show.  He visited every last one of us I am pretty sure (we didn't put him there, he came to investigate on his own).

Coming soon, pictures of the other reason I have been away for so long.  We have been working hard getting ready for an art show and used book sale at the school my children attend.