So Tuesdays is usually "Using what I have to make what I need" day here on my blog. Well, tonight, what I needed was dinner on the table...so I thought I would share a recipe.
Let me start off by saying that I love egg rolls. However, I do not love frying food. So, my solution...baked egg rolls.
Once again, my recipe is a guideline...after all, it's about using what you have, or what you like.
2 cups mushrooms, diced
3 celery sticks, finely diced
2 heads baby bok choy, finely sliced
2 green onions, sliced
3/4 lb bean sprouts
Chinese 5 spice
sesame oil
soy sauce
wanton wrappers, spring roll wrappers, phyllo dough...whatever kind of wrapper you have
Put about 2 tbsp oil in a pot/ large pan/ wok. Saute the mushrooms until they are almost cooked through. Add the celery and continue to saute until they are soft. Add the bok choy and green onion. Saute about 1 minute. Add the bean sprouts. Stir. Sprinkle on a little soy sauce. Stir. Sprinkle some Chinese five spice over the top. Stir. Sprinkle a little sesame oil over the top. Stir. Add whatever flavour you like in your egg rolls. Stir...you see where I am going with this.
Let it cool for a few minutes.
Put a good whopping spoonful of the filling in the middle of your wanton wrapper. You want to have it laying out like a diamond. Fold it up like an envelope, sides in first, then top, then bottom. I like to rub a little water on the edge when I fold up the bottom to get a nice good seal.
Continue until you run out of filling. Lay them all out on a cookie sheet lined with a silpat liner.
You could use spring roll wrappers instead if that is what you happen to have, or even phyllo dough. I have made these little pockets with phyllo dough before and they have come out lovely.
Ok, once they are all lined up on your cookie sheet, brush on a little olive oil...a little goes a long way with these. Flip them over and brush the other side. My brush was MIA so I just rubbed it on with my fingers. I used a little less than 1 tbsp of oil for 12 egg rolls.
Bake at 450 for about 10 minutes... Flip...bake them another 10. It is the bottom that gets golden, so just keep them in there until you like the look of them.
They come out nice and crispy, just like a fried egg roll, without the frying. We had it with rice and lemon chicken, but any stir fried veg is nice with it too...that's what we do in the summer when we have all that nice fresh stuff.
Enjoy.
Monday, 20 February 2012
Thursday, 16 February 2012
Building a well with some cookies
The boys' school has decided it is going to run a series of small fundraisers to build a well for a community in, I believe, India. The have had a "hat day" where the students get to wear a hat in class if they pay $1.00. They have a few other things planned, all for $1.00.
Tomorrow, they are having a bake sale...with items ranging from 25 cents to $1.50...so, tonight, I am making cookies. Chocolate Malt Cookies. This is one of my all time favourite cookie recipes. It is from this book...
...from 1985. Don't you love vintage cook books. I will show you some images from my favourite page, and then I will share the recipe.
Yep, uh-huh...that is a doll making the gingerbread cookies. Seriously, I love vintage cook books.
OK, so the recipe:
1 1/4 cups all purpose flour (I use half all purpose, and half whole wheat)
1 cup instant sweetened chocolate flavored malted milk powder (I use Ovaltine)
1tsp baking powder
1/4 tsp salt
1/2 cup butter (I use about 3/8 cup)
1 cup light brown sugar, firmly packed (I use 3/4 cup, lightly packed)
1 egg
1 tsp vanilla
1/4 cup undiluted evaporated milk
1 cup chopped walnuts (which I omitted as there is a nut allergy at the school)
Sift together the dry ingredients. Set aside.
Beat butter, sugar, egg, vanilla until fluffy. Beat in milk until smooth.
Add dry ingredients to wet ingredients. Stir in nuts, if using.
Refrigerate at least 1 hour, covered.
Drop by rounded teaspoons, 2 " apart on lightly greased cookie sheet (or silpat liner).
Bake at 350F for 10 - 12 minutes until set but not browned.
Remove to wire rack to cool completely.
It says that it makes 4 1/2 dozen cookies, but I beg to differ. Tonight, I made small cookies and it made 72 for a double batch...so 3 dozen per batch.
I had forgotten that they had to go in the fridge for an hour, so while I was waiting,I licked the beater I made little flags for the cookies:
using these stickers for the printer...they are address labels:
Avery 8160 if you are interested. I just lined up the edges so that is was kind of looped in half, put a toothpick in the opening, and finished folding them together. I actually tried printing them in colour first but they look much better in black and white for some reason.
They will be packaged 2 in each paper cupcake wrapper (kids will be touching this stuff, so I thought it would be much more hygienic to have paper wrappers than have kids pawing all over the cookies - oh, you may not know that about me yet...I am a germ-a-phobe! A big time, gross me out, I can't believe you are going to touch/eat that, germaphobe).
Like this:
Ta-La! Now, if you will excuse me I am off toeat some cookies tuck the kids into bed. Good night all.
Tomorrow, they are having a bake sale...with items ranging from 25 cents to $1.50...so, tonight, I am making cookies. Chocolate Malt Cookies. This is one of my all time favourite cookie recipes. It is from this book...
...from 1985. Don't you love vintage cook books. I will show you some images from my favourite page, and then I will share the recipe.
Yep, uh-huh...that is a doll making the gingerbread cookies. Seriously, I love vintage cook books.
OK, so the recipe:
1 1/4 cups all purpose flour (I use half all purpose, and half whole wheat)
1 cup instant sweetened chocolate flavored malted milk powder (I use Ovaltine)
1tsp baking powder
1/4 tsp salt
1/2 cup butter (I use about 3/8 cup)
1 cup light brown sugar, firmly packed (I use 3/4 cup, lightly packed)
1 egg
1 tsp vanilla
1/4 cup undiluted evaporated milk
1 cup chopped walnuts (which I omitted as there is a nut allergy at the school)
Sift together the dry ingredients. Set aside.
Beat butter, sugar, egg, vanilla until fluffy. Beat in milk until smooth.
Add dry ingredients to wet ingredients. Stir in nuts, if using.
Refrigerate at least 1 hour, covered.
Drop by rounded teaspoons, 2 " apart on lightly greased cookie sheet (or silpat liner).
Bake at 350F for 10 - 12 minutes until set but not browned.
Remove to wire rack to cool completely.
It says that it makes 4 1/2 dozen cookies, but I beg to differ. Tonight, I made small cookies and it made 72 for a double batch...so 3 dozen per batch.
I had forgotten that they had to go in the fridge for an hour, so while I was waiting,
using these stickers for the printer...they are address labels:
Avery 8160 if you are interested. I just lined up the edges so that is was kind of looped in half, put a toothpick in the opening, and finished folding them together. I actually tried printing them in colour first but they look much better in black and white for some reason.
They will be packaged 2 in each paper cupcake wrapper (kids will be touching this stuff, so I thought it would be much more hygienic to have paper wrappers than have kids pawing all over the cookies - oh, you may not know that about me yet...I am a germ-a-phobe! A big time, gross me out, I can't believe you are going to touch/eat that, germaphobe).
Like this:
Ta-La! Now, if you will excuse me I am off to
Sometimes you just feel fancy
...or otherwise could be called "in which I spend way too much time on a bookmark"
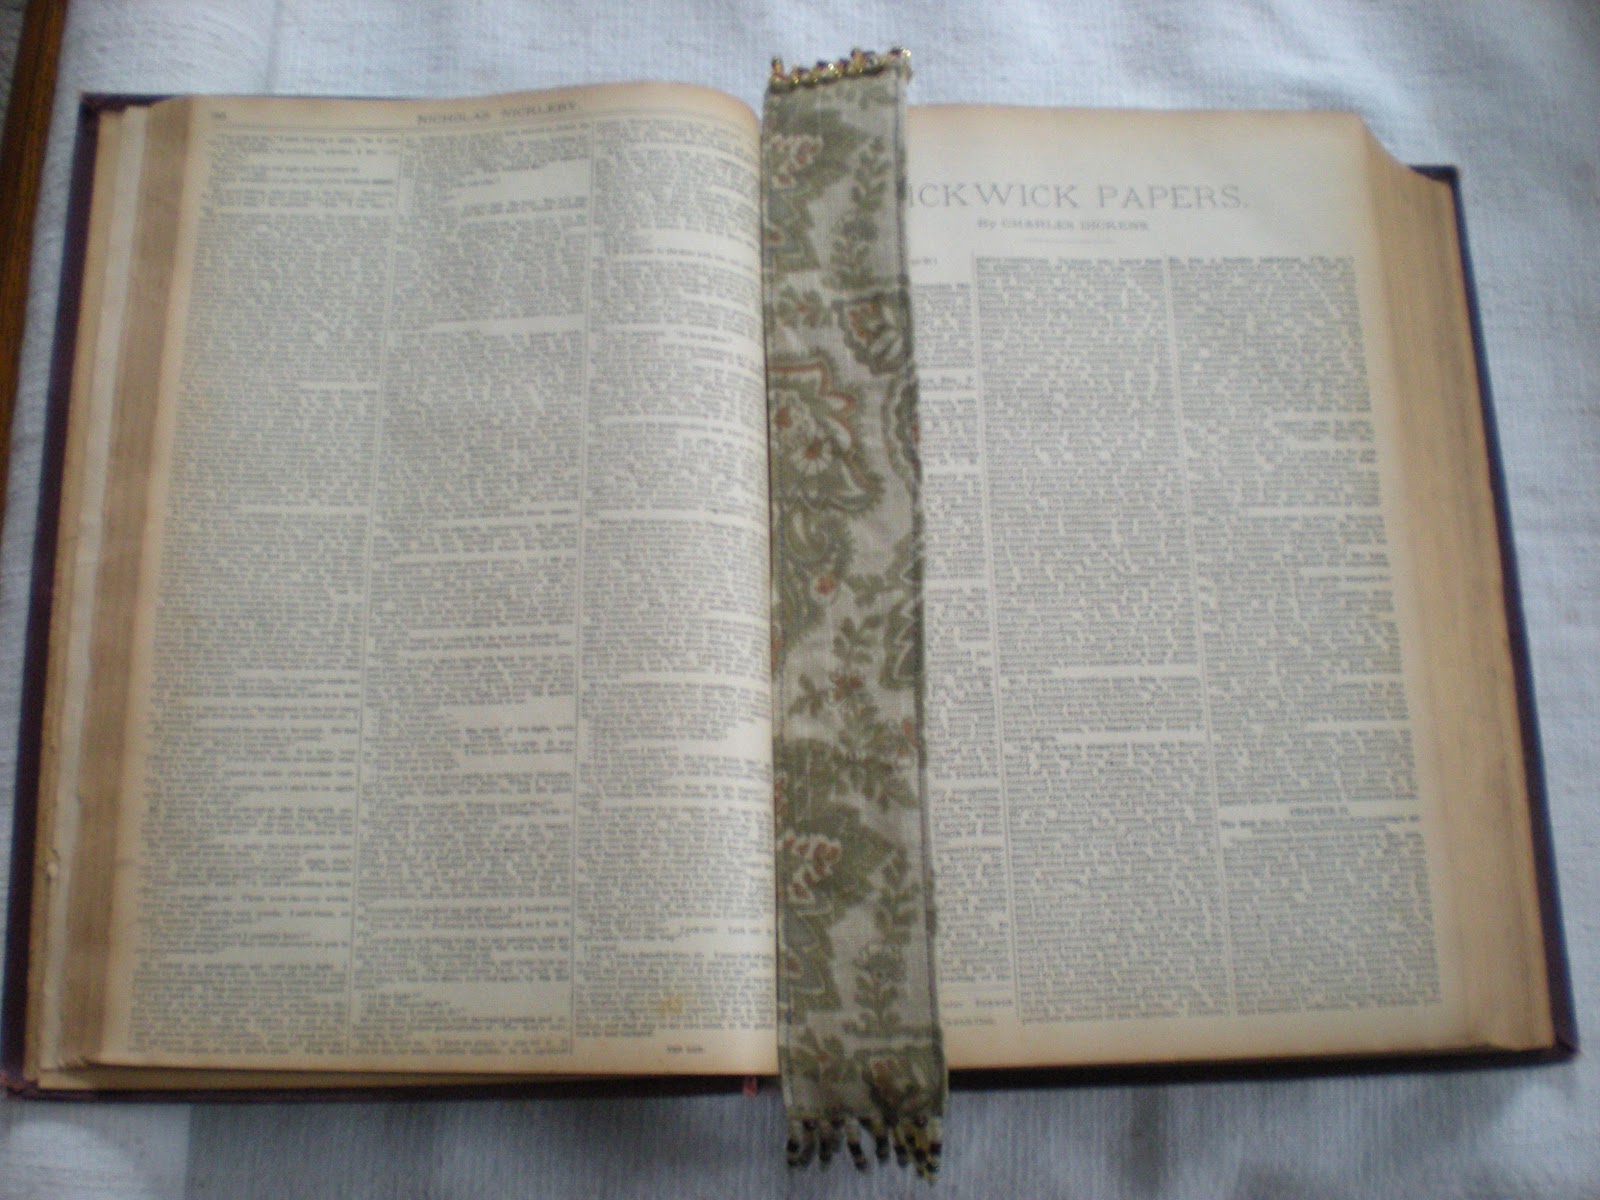
In general, I am not a very fancy person. I don't where fancy clothes. I don't have fancy things in my house. My garden is almost strictly functional rather than for "landscaping". But once in the while, I find myself spending an insane amount of time on an every day item to make it just simply over the top. This week, I did just that.
This is my new book mark. It is gigantic. I made it to hold the page in the book I was using for learning cables (see yesterday's post if you wish). It is 15" long...and beaded...
This is the top. It has three rows of beads. Hold on, I think I have a more close-up view...
So, three things:
1. Whenever we use them, N calls whatever is in them the "appetizer" (except when they are finger bowls, although they have both been known to skip the finger bowl part and just drink the lemon water). He sets them on the table, and is just thrilled to be eating his "appetizer"...even if it was part of his supper anyways.
As I said, we are not fancy people, so a real and true appetizer does not make a frequent appearance around here. It is enough just to get the dinner on the table most days, yes?
2. I love them because for years, I imagined them as Tasha Tudor's finger bowls from "Becky's Christmas".
These finger bowls were a part of every holiday. They were of thick green glass, and after dinner everyone wet the tips of his fingers and ran them around the edges of the bowls, making thereby wonderful singing vibrations without which Becky would have considered a Christmas or Thanksgiving dinner incomplete.
Note: Mine do not make "wonderful singing vibrations". They are just pretty.
3. I once found another set identical to this, but in orangey-yellow at a vintage shop while I was looking for something else. For $1.00 a piece. It took every ounce of my will power to leave them behind (we are working on living with less "stuff", right?). I have never been back to that particular store because I don't think I would be able to leave them behind a second time on the off chance that they are still there.
Enjoy your day everyone...will it be fancy?
In general, I am not a very fancy person. I don't where fancy clothes. I don't have fancy things in my house. My garden is almost strictly functional rather than for "landscaping". But once in the while, I find myself spending an insane amount of time on an every day item to make it just simply over the top. This week, I did just that.
This is the top. It has three rows of beads. Hold on, I think I have a more close-up view...
This is the bottom...
Ok, here is the top. There is a row of dangly bits in the center, and then a loopy kind of row on each side.
and here is my very sad attempt at showing you how to make it.
I had a tiny piece left from my kitchen curtains. Fabric that I love. Fabric that I thought would be too small to make anything useful with, but I kept it anyways. So I cut a rectangle, folded it in half, sewed around the edges. Then, I strung on the beads.
I started with the middle row. Just string the beads onto your needle in the order that you want them. Top off the row with a seed bead, then string back through the row the opposite direction...all except your seed bead, which will hold everything in place. Then stitch back through your fabric and do the next row.
For the loopy rows, I strung on the beads for each loop, and placed a stitch where I wanted the loop to end, and kept going along both sides. I took me well over an hour and a half to make this bookmark,
but isn't it fancy?!?
So, although you can see by the size of it, it didn't make much of a dent in my stash...but, it was stash busting just the same (the beads are left over from a bracelet I made for a friend a few years back).
Please come on over and join the stash bash fun at Crunchy Catholic Momma.
And speaking of fancy...it is time for Three Things on Thursdays.
I have 6 of these green goblets. We use them for grapefruit (as here) or fruit salad, or whatever, when we are in a fancy kind of mood. And for "feasts", warm water and a lemon wedge as finger bowls.
So, three things:
1. Whenever we use them, N calls whatever is in them the "appetizer" (except when they are finger bowls, although they have both been known to skip the finger bowl part and just drink the lemon water). He sets them on the table, and is just thrilled to be eating his "appetizer"...even if it was part of his supper anyways.
As I said, we are not fancy people, so a real and true appetizer does not make a frequent appearance around here. It is enough just to get the dinner on the table most days, yes?
2. I love them because for years, I imagined them as Tasha Tudor's finger bowls from "Becky's Christmas".
These finger bowls were a part of every holiday. They were of thick green glass, and after dinner everyone wet the tips of his fingers and ran them around the edges of the bowls, making thereby wonderful singing vibrations without which Becky would have considered a Christmas or Thanksgiving dinner incomplete.
Note: Mine do not make "wonderful singing vibrations". They are just pretty.
3. I once found another set identical to this, but in orangey-yellow at a vintage shop while I was looking for something else. For $1.00 a piece. It took every ounce of my will power to leave them behind (we are working on living with less "stuff", right?). I have never been back to that particular store because I don't think I would be able to leave them behind a second time on the off chance that they are still there.
Enjoy your day everyone...will it be fancy?
Tuesday, 14 February 2012
Halted in Progress Yarn Along.
It is in fact Tuesday night, but I am going to pretend it is Wednesday morning... and get my post ready to join Ginny at small things for another round of Yarn Along.
Moving on to a new cable this week. This is as far as I got on it...the pattern was in a library book which I had to return today, so I am on hold. Not to worry, I have purchased the book, and it is in transit, and should be here in a few days so I will be able to move on.
The book in the picture is Brian's Return, which apparently is the last in the series. I had read Brian's Winter, and knew that I had missed Hatchet (the first in the series), but I was OK with that since Brian's Winter was kind of an alternate ending to Hatchet. I didn't know that there was another book in the series that I missed called The River. So now, I will be on the lookout for both Hatchet and The River. Briefly, it is about a boy who is returning to the woods after two years of being in the city. He had previously been in a plan crash and had to survive in the wilderness for months before finally making it back. He returns because he just can't live in the city anymore. I truly enjoyed this book...a big part of which is because we feel the need, every single day, to get our butts out of the city. We don't know where, we don't know when, and we don't know how we are going to do it...but we feel the need. And for some of us, it grows stronger every day.
Somehow.
And back to the yarn along...I think my cable looks OK for the first run at it. I like it much better in white. And I like it much better in the book. I am hoping by the time I make the second and third of the strips I will have it looking just dandy. The book, if you are wondering, is Country Weekend Knits and it is so nice that I have bought it. It is only the second knitting book I have ever purchased if that gives you a hint. Usually I get them from the library.
And...all of the yarn for this work in progress is from my stash of wool, so I am adding the link below for any that have missed it.
Moving on to a new cable this week. This is as far as I got on it...the pattern was in a library book which I had to return today, so I am on hold. Not to worry, I have purchased the book, and it is in transit, and should be here in a few days so I will be able to move on.
The book in the picture is Brian's Return, which apparently is the last in the series. I had read Brian's Winter, and knew that I had missed Hatchet (the first in the series), but I was OK with that since Brian's Winter was kind of an alternate ending to Hatchet. I didn't know that there was another book in the series that I missed called The River. So now, I will be on the lookout for both Hatchet and The River. Briefly, it is about a boy who is returning to the woods after two years of being in the city. He had previously been in a plan crash and had to survive in the wilderness for months before finally making it back. He returns because he just can't live in the city anymore. I truly enjoyed this book...a big part of which is because we feel the need, every single day, to get our butts out of the city. We don't know where, we don't know when, and we don't know how we are going to do it...but we feel the need. And for some of us, it grows stronger every day.
Somehow.
And back to the yarn along...I think my cable looks OK for the first run at it. I like it much better in white. And I like it much better in the book. I am hoping by the time I make the second and third of the strips I will have it looking just dandy. The book, if you are wondering, is Country Weekend Knits and it is so nice that I have bought it. It is only the second knitting book I have ever purchased if that gives you a hint. Usually I get them from the library.
And...all of the yarn for this work in progress is from my stash of wool, so I am adding the link below for any that have missed it.
Monday, 13 February 2012
Something I needed...
I have had a piece of fabric that I have been keeping for a while because I just couldn't dare cut into it.
...well I finally did it. I found the perfect project for it.
I have finally made myself a knitting bag. It is full of all kinds of wonderful pockets:
...and it is tapered so that it is smaller at the top than at the bottom so my project isn't always trying to fall out.
...and I love it!
I love it so much, I put the pattern in my new etsy shop so you can make one too. I have also added the button to my sidebar.
Hop on over to Frontier Dreams to check out what other people are doing for
Keep Calm and Craft On.
Sunday, 12 February 2012
Shameless self promotion - times two
I received some rather exciting news today. Exciting for me anyways...
Debby at Cooking up a Storm in a Teacup has given me a Versatile Blogger Award.
Da da da DAAAAH! Thank you Debby. I appreciate it muchly! And now, I get to give the award to 15 new to me, or newly discovered blogs. Yippee. It is going to take me a bit of time to get my list together, but you bet our bippees that I will be doing just that. Can you tell I am excited? I just said "you bet your bippees"!
Pop on over to see who else she gave the award to. I am in some seriously good company.
And for part two of tooting my own horn...I have finally done it...well, I have finally started it.
I have actually gone and opened an Etsy site. There is not too terribly much listed yet, but I have been working for several weeks to make things, and will be working this week to get them listed.
And...when I am done listing, I will be doing a GIVEAWAY. So stay tuned. It should be next week or the one after.
And totally unrelated...
something interesting I saw today:
We went sledding today, to make the most of our second snow this winter, and look what I found. Tiny little roly-poly snowballs stopped in their own tracks partway down the hill. Huh!
Just thought they were cute. I don't know how they got there since we were the first on that particular hill.
Debby at Cooking up a Storm in a Teacup has given me a Versatile Blogger Award.
Da da da DAAAAH! Thank you Debby. I appreciate it muchly! And now, I get to give the award to 15 new to me, or newly discovered blogs. Yippee. It is going to take me a bit of time to get my list together, but you bet our bippees that I will be doing just that. Can you tell I am excited? I just said "you bet your bippees"!
Pop on over to see who else she gave the award to. I am in some seriously good company.
And for part two of tooting my own horn...I have finally done it...well, I have finally started it.
I have actually gone and opened an Etsy site. There is not too terribly much listed yet, but I have been working for several weeks to make things, and will be working this week to get them listed.
And...when I am done listing, I will be doing a GIVEAWAY. So stay tuned. It should be next week or the one after.
And totally unrelated...
something interesting I saw today:
We went sledding today, to make the most of our second snow this winter, and look what I found. Tiny little roly-poly snowballs stopped in their own tracks partway down the hill. Huh!
Just thought they were cute. I don't know how they got there since we were the first on that particular hill.
Thursday, 9 February 2012
My husband is a genius and he calls it Pilgrim Pie
A few weeks ago, my husband asked me if we could come up with a way to make something like Shepherds Pie but made with the ingredients for Thanksgiving dinner, or a big turkey feast. After tossing some ideas back and forth, this is what we came up with:
The following are some general instructions rather than a recipe per se, because if you want to make this (and let me tell you, it was delicious) you would probably want to tailor it to suit your regular "feast" flavours.
Middle layer: I cooked up a turkey breast the night before, so that it would be faster when I got home from work. Then I just sliced it thinly when it was cold.
Bottom layer: Stuffing - You could make whatever your traditional stuffing is - here is what I did:
Chop up 3 celery stalks and 1 onion into tiny little pieces and saute in a pat of butter (generous) until they are nice and soft. Add about a cup and a half of broth. Sprinkle the entire pan with ground sage. Toss in some "stuffing croutons" (I just chop up some bread into cubes a few days in advance and let them dry out - this time around it was italian semolina bread). Mix it all up until the bread has soaked up the broth. Add more broth if your bread is still to crunchy. Pour this mixture into the bottom of the dish you will be using for your Pilgrim Pie and bake for about 20 minutes at 425F.
Top Layer: While you are toasting up your stuffing, roast your vegetables at the same time. I know a lot of people have green bean casserole for their Thanksgiving dinner, but we stick with root vegetables, so this is what I did: Cut up 5 small white turnips, the 2 largest carrots I have ever seen in my life, and 5 or so parsnips into chunks. Basically, you would want enough root vegetables (or whatever) to fill a 9 x 9" pan. Drizzle with a little olive oil, and mix them around to coat. Roast for 30 minutes or so (I think I had the oven at 425 F).
While the root veg are roasting continuing their extra couple of minutes, layer the turkey on top of your toasted stuffing. Cover this with gravy (shhh...I used a packet mix...it was a work night). Then cover the whole thing with the roast veg and bake again for another 20 minutes or so until everything is nice and bubbly and warm and your root veg are soft enough to your liking.
The following are some general instructions rather than a recipe per se, because if you want to make this (and let me tell you, it was delicious) you would probably want to tailor it to suit your regular "feast" flavours.
Middle layer: I cooked up a turkey breast the night before, so that it would be faster when I got home from work. Then I just sliced it thinly when it was cold.
Bottom layer: Stuffing - You could make whatever your traditional stuffing is - here is what I did:
Chop up 3 celery stalks and 1 onion into tiny little pieces and saute in a pat of butter (generous) until they are nice and soft. Add about a cup and a half of broth. Sprinkle the entire pan with ground sage. Toss in some "stuffing croutons" (I just chop up some bread into cubes a few days in advance and let them dry out - this time around it was italian semolina bread). Mix it all up until the bread has soaked up the broth. Add more broth if your bread is still to crunchy. Pour this mixture into the bottom of the dish you will be using for your Pilgrim Pie and bake for about 20 minutes at 425F.
Top Layer: While you are toasting up your stuffing, roast your vegetables at the same time. I know a lot of people have green bean casserole for their Thanksgiving dinner, but we stick with root vegetables, so this is what I did: Cut up 5 small white turnips, the 2 largest carrots I have ever seen in my life, and 5 or so parsnips into chunks. Basically, you would want enough root vegetables (or whatever) to fill a 9 x 9" pan. Drizzle with a little olive oil, and mix them around to coat. Roast for 30 minutes or so (I think I had the oven at 425 F).
While the root veg are roasting continuing their extra couple of minutes, layer the turkey on top of your toasted stuffing. Cover this with gravy (shhh...I used a packet mix...it was a work night). Then cover the whole thing with the roast veg and bake again for another 20 minutes or so until everything is nice and bubbly and warm and your root veg are soft enough to your liking.
This is the best shot I could get of the layers.
Enjoy, my friends. Enjoy.
Linking this to: The self sufficient HomeAcre - winter hop
Thursday, 26 January 2012
Felting
Our cat does not play with cat toys. Instead, he steals balls from the boys' rooms, plays with them, and leaves them all over the house. So N thought maybe Hobbes (the cat) needed something of his own to play with.
Wool felt balls in various stages of completion.
A few years ago, a kind farmer friend I know let me have a whole huge sheep fleece. I spent an entire summer washing, and picking and cutting the pieces I could salvage so that I could try my hand at dying the wool with plants growing in our yard. Now, this fleece isn't good enough for spinning (something I have tried a tiny little bit, but plan on doing some more this year) but it is fantastic for stuffing things, and I thought we would try some felting with it.
Carding...this took two nights due to attention span issues :)
This picture was not, in fact, posed. The cat kept following us wherever we moved the fleece to. And laying down on it, beside it, eating it...you name it. That big cheese box in the back...that's what I keep my fleece in.
What? People don't keep their fleece in a cheese box? :)
We both did a bit of the needle felting to get the fleece into a rough ball shape, and not so loose. This is our first real attempt at felting so we were kind of testing things out as we went along.
We moved on to wet felting. The tutorials on the internet said to alternate hot water and cold water and use plenty of dish soap. So that's what we tried...note: this plus a nine year old makes a mess...a happy mass, but a mess none the less.
Make sure you get plenty of lather going...
...put your hands in this very essential formation...
..and blow very gently.
This is a very important step in the wet felting process. It must be, considering the amount of time that was spent on this step alone.
Which is why, only two balls are felted, and a few are partially felted, and at least one..not at all felted.
Good thing we have time on our hands.
I just turned around and the cat has made off with all but the largest unfelted ball. Hmmm. He has been playing with the two finished ones for a few weeks. They are a big hit.
Join along with Linda at Natural Suburbia for Creative Friday, and
Andrea of Wisdom Begins in Wonder for Fiber Arts Friday.
Today I am thankful for: our lovely town library...I got quite the haul this week, and projects lined up.
Wednesday, 25 January 2012
Oatmeal Chocolate Chip cookies
A family recipe:
Ingredients:
3/4 cup butter, room temperature
1 1/2 cups brown sugar, not packed
2 eggs
1 tsp vanilla
2 cups flour (I use whole wheat, but you can use whatever)
1 tsp baking powder
1/2 tsp baking soda
2 cups rolled oats
1 cup chocolate chips
1 cup coconut
you can add pecans or other nuts if you wish...and I have also added wheat germ before and you can't tell it is in there...oh, and I have added up to a cup of dried cranberries without a problem.
Cream together the butter and brown sugar. Add eggs and vanilla.
In a separate bowl, combine flour, baking powder, baking soda, coconut, and rolled oats. If you are adding wheat germ, add it here.
Add the dry mixture to the wet mixture and mix until well combined.
Add whatever "stuff" you are adding in...dried fruit, chocolate chips, nuts...make them yours, right?
Mix until well combined.
Drop by the spoonful onto a cookie sheet lined with a silpat liner. Bake at 350 for 8 to 10 minutes, or until they are firm enough for your taste. (Please note: I always check them at 10 minutes, and I always put them back in for a few more minutes, as my oven is "wonky" at 350...I usually regret the last minute or two.) Cool on sheet before removing to a rack.
Also note: I made 40 cookies from the recipe above, with another roll of dough in the freezer that will probably make 24 or so. This makes a good size batch of cookies...so feel free to make a half batch :)
Have you met me? I don't do the half batch! Cookies will be my downfall.
Enjoy!
Today I am thankful for: my cold starting to disappear. I can see! I can breathe! woo-woo! A few more days and I should be right back to "normal".
Thursday, 12 January 2012
Cast iron pan handle cover
I am joining several people with today's post...I will link at the bottom.
First up: Stash-busting.
This piece of wool from an (accidentally) felted sweater was in my stash, and has been for a few years. I have used most of the rest of the sweater but I have a few pieces left. I fished out the smallest ball of wool yarn I could find, and voila!...
...a handle cover for my cast iron skillet. And since this was quick, and I have more than one cast iron pan...
...I made a few more. I know that since these pans have been around for years and years (I'm sure all our grandmothers and great-grandmothers had them) that I am not the first person to ever come up with this, but it felt pretty darn good to make something so useful and quick with what I had sitting around. I just rolled up the sweater piece so that there would be two layers top and bottom, and blanket stitched around it. Easy, peasy, and kind of cute, no?
Subscribe to:
Posts (Atom)