The spring shows are nearly upon is, which means it's time to get my show props ready.
Pottery is hard enough to pack for shows without having to worry about fragile fresh flowers or fruit or such, so this year I am working on making some very light weight show props. First up are these cute little knitted pears that will go in some of my fruit bowls.
I used a free pattern from Natural Suburbia for the two smaller ones, but decided I needed one that was slightly bigger, so I modified it just the tiniest bit.
Technical talk: In round 6, I increased every other stitch instead of every 4th. Then I added a couple of rows to the first straight knitting section (3, maybe?). In the decreases, I stopped when I had 11 stitches on, and added 2 rows or so to that straight knitting section.
Also, I did the first 5 rows on straight needles and only joined in the round on the 6th row because I find knitting in the round too fiddly with just a couple of stitches on there...which meant that I could stuff the pear from the bottom instead of the top.
I plan on making a couple of "beige" pears, since I have a surprising number of green dishes (although I don't mind them with this plate at all).
Up next? Possibly her apple pattern? I haven't decided for sure yet.
Linking up with: Keep Calm Craft On over at Frontier Dreams
Fiber Arts Friday at Wisdom Begins in Wonder
Creative Friday at Natural Suburbia
From the Farm Blog Hop
Pages
▼
Monday, 24 March 2014
Thursday, 20 March 2014
Happy Spring!
Happy Vernal Equinox my friends. Although it is officially the last day of winter my yard is still buried in snow. I'm sharing this picture from last spring to keep heart and remind us all that spring weather will eventually arrive.
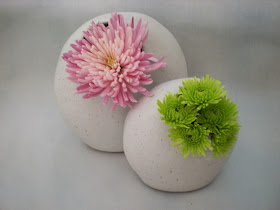
And just because I am dreaming of flowers...here is my latest project - drying and very, very fragile at this point. It's about 10" across and I get nervous every time my boys walk past it in case of "accidents".
And just because I am dreaming of flowers...here is my latest project - drying and very, very fragile at this point. It's about 10" across and I get nervous every time my boys walk past it in case of "accidents".
Tuesday, 18 March 2014
Working on Costumes for the Carlisle Country Craft and Old-Fashioned Mercantile
Last year I attending the Carlisle Country Craft and Old Fashioned Market Mercantile as a vendor for the first time. click here to see pictures of last year's event
I had such a great time I thought the boys would like to go with me this year. Well, not only are they coming, but S is going to be one of the buskers (magic) and N is going to be the "Gamesmaster" to help entertain children and add to the festivities. Needless to say, costumes are in order - they're optional, but seriously, we all know that I'm going to make costumes - who can pass up a chance to dress up as a pioneer for the weekend?
Although there are hundreds of ideas out there for girls (I have been collecting a few of them on this Pinterest board), the patterns for boys are limited. I have decided on vests, suspenders, pouches, hats and possibly a bow tie for S, and then just regular pants and a light coloured plaid button up shirt (if I can find them).
I started by looking for patterns on-line and in the costume section of pattern books at my local fabric store. I couldn't find anything that was the right size and style. But then, in the clearance section I found this one...it's NewLook #6036...for $1.00!
I actually bought a men's jacket at the Goodwill to take apart for this vest because I wanted the nice big pre-made pockets. The boys each picked out their own with the fabric they liked ---funny enough, not even close to what I would have picked out for them (I would have picked brown tweed). The lining on this one isn't from the jacket, since I sliced right through it while taking the jacket apart. I think I might line the other one in plaid flannel for fun.
There is just one part that I'm not too happy with. The jacket I bought had a lapel pocket and no matter how I positioned the pattern piece, I couldn't get it to fit and still keep the pocket at the bottom. I ended up having to cut below the lapel pocket and make the front pattern piece out of two pieces, using a spare piece from the arm. I'm hoping it will look better once it is ironed very carefully. (Note: the orange shirt was for contrast in the photo, and then somebody decided he looked so great he had to wear the ensemble to school this morning - as is...pick your battles, right?).
Also, this morning, N asked if I could add a button. From the picture on the pattern, I thought it would allow space for button holes, but it turns out the buttons are just decorative. I'm going to add button holes to both sides and lace it up, I think (like Peter in Monastic Tudor Farm on TVO - are you watching that? It's the best one yet!). On S's vest, I will add an extra piece to the pattern to allow for buttons - I think).
A note about sizing: I made the size XS first after measuring my 14 year old. It fits my 11 year old - and he's not big for his age. I'm going to have to make the M for S. If you are going to use this pattern, I would suggest making at least one size bigger than the measurements suggest - I'm going 2 sizes bigger for S.
We also picked up this hat at the Goodwill for an extra $4.00. They had leather cowboy hats and lots of straw hats. The girl that was working said they often have them in.
Linking up with: Keep Calm Craft On over at Frontier Dreams
Wednesday, 12 March 2014
From the kiln
Lots of new items are coming out of the kiln lately...enough to finally re-open the etsy shop. It's a slow process, but I'm getting there.
Tiny vases
Pansy pods
Acorn beads and oak leaves
Lots of vases...since I'm getting ready for spring shows.
Mugs---sold in pairs on etsy, since it costs the same to ship one mug as to ship two...silly.
Great big colander
Lots and lots of leaf candle/dip cups.
Soap dishes starting to come out, but I'm not sure yet about listing these as the shipping will probably more than double the price. To be dettermined.
Pencil pods-otherwise known as bud vases
Yarn bowls.
Lots and lots of pictures still to take. I'm still pretty new to photography so it takes me a really long time to photograph the pottery...although the photography session we did at the potters' guuild has helped tremendously.
Linking up with: Creative Friday At Natural Suburbia
Saturday, 8 March 2014
Game #3 for the Village Green
I'm still plugging away at making a few of the games that will be available for families to entertain themselves with at the Carlisle Country Craft and Old-Fashioned Market Mercantile in August.
This month's contribution is "Tic-Tac-Toe" ---and in true pioneer spirit it is made from a flannel shirt, 2 pairs of corduroy pants, and a few bits of felt scraps.
You'll want to change the sizes to suit whatever fabric bits you are using, but I'll give you the run-down just in case.
For the "game board" I cut 6 1/2" squares from two pairs of outgrown curdoroy pants and sewed them together in a 3x3 grid using a 1/2" seam allowance. I ended up cutting a little of the sides so that I could turn the edges of the backing over instead of using seam binding. After the back and front were sewn together, I sewed a line 1/4" from each of the seams to give it a quilted look, and to stabilize the whole thing.
This month's contribution is "Tic-Tac-Toe" ---and in true pioneer spirit it is made from a flannel shirt, 2 pairs of corduroy pants, and a few bits of felt scraps.
You'll want to change the sizes to suit whatever fabric bits you are using, but I'll give you the run-down just in case.
I cut the biggest square I could from the back of the flannel shirt (18" square) and then used the front and the sleeves for the bean bags. I cut 9" x 4.5" rectangles, folded them in half right sides together, sewed one side and the bottom, filled the just under half way with beans, and machine stitched them shut. Although it would have been easier to add the Xs and Os before-hand, I wasn't sure what I wanted to use, so I hand stitched them on after the fact.
I made a paper template for the Xs and Os to make sure it would fit nicely, and then traced them on to bits of felt. I chose to keep them neutral, but depending on the event, nice bright colours would work just as well.
I'm pleased with the result as it looks a little "boyish" - the boys thought I should balance out the games since they thought the Hopscotch looked a little "girlish" by the time it was done.
We tested it out...I was X's...
...and one of them never learns.
Enjoy.
Linking up with: Keep Calm Craft On over at Frontier Dreams
Monday, 3 March 2014
A fun little sewing project.
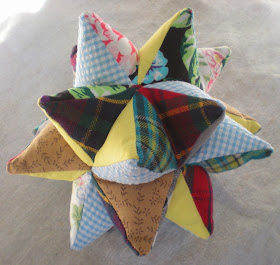
This little number has been on my "Inspiration for the school art show" Pinterest board for years, but I hadn't gotten around to making it yet because I didn't know what to do with it after. Now that I have a recipient lined up for it, I thought it would make the perfect project for this year's show.
If you are new here, every year the elementary school my youngest child attends hosts an art show where the projects are made of recycled/upcycled materials. As the organizer, I like to contribute a project as well.
Mostly, I followed the directions over here but I don't have an AccuQuilt Go (I don't even know what it is) so I made my own template...
My kids LOVED the finished project. I believe the term "awesome" was used. They would really like to keep it, but I have someone else in mind. If I were to make another one, I think I would add the seam allowance to the outside of the triangle rather than inside the template (basically, make the template bigger) as this was very finickity at times. Also, I don't think it really matters what shape your triangles are, so long as they are all the same, so I would be interested to try another one with really long, pointy triangles.
If you are new here, every year the elementary school my youngest child attends hosts an art show where the projects are made of recycled/upcycled materials. As the organizer, I like to contribute a project as well.
Mostly, I followed the directions over here but I don't have an AccuQuilt Go (I don't even know what it is) so I made my own template...
...from a cereal box of course. I drew out a 3" square, marked the middle point at the top, connected to the corners and cut it out. I think any isosceles triangle will work.
I cut 60 of the triangles from random bits of scraps and clothes...
...and then put set them up in groups of three until I was happy with all the pattern groupings.
For assembly, start by following the directions here. Tip: She doesn't say what to do after the 12th triangle is attached. I kept adding in the spaces until I had a group of 5 at the top, with 5 in the spaces beneath that, and another row between the spaces beneath that. Then I sewed the last 5 together into a "crown" and sewed that into the bottom. I had to alternate between machine sewing and hand sewing throughout this project as it was very difficult to fit the layers through the machine.My kids LOVED the finished project. I believe the term "awesome" was used. They would really like to keep it, but I have someone else in mind. If I were to make another one, I think I would add the seam allowance to the outside of the triangle rather than inside the template (basically, make the template bigger) as this was very finickity at times. Also, I don't think it really matters what shape your triangles are, so long as they are all the same, so I would be interested to try another one with really long, pointy triangles.
Completely superfluous picture of my sewing buddy.
Happy crafting all!


.JPG)


