Pages

Tuesday, 29 October 2013

Handmade Holidays - Stuffies

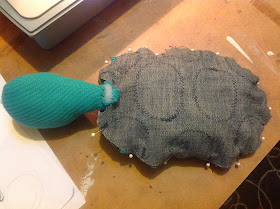
Today's edition of Handmade Holidays is brought to you by my wonderful sister "A" and her equally wonderful husband "B".  They have made the most lovely stuffies for the babies of family and friends.   B drew out the patterns - kind of a cross between a live animal and a cartoon...and then they upcycled some clothes and fabric remnants to come up with great combinations.
 Sea turtle
 Whale
Elephant
Lots of elephants...I love their tails tied up in a knot.

If you would like to make your own, she has generously shared photos of the hand-drawn patterns with me, but I don't know how to share them with you other than just showing them here:
I wondered how they were able to get the ear inserted...the head and body are two separate pieces with the ear sandwiched in between.  The elephants have different fabrics on each side, as well as different fabrics for the ears - for the full tactile experience.

 For the sea turtle, the spots were sewn on first, and then the body was assembled (the arms and legs are tucked in there as well-and sewn right into the seam).

The whale's fins(?) are also tucked into the seam.
I can't help but wonder if one lucky person is getting this matching set.

Is anyone else getting busy with their holiday crafting?  I have a few projects on the go...it's just hard to finish them up now that the boys stay up later - less "secret crafting" time.  I have taken to bringing a project to work for lunch time but not much progress happens in just 15 minutes at a time.

Incidentally, all of my Handmade Holidays posts to date can be found on this pinterest board.

                          Fiber Arts Friday over at Wisdom Begins in Wonder
                          Creative Friday at Natural Suburbia


Friday, 25 October 2013

The big muffin.

Quick post today.  
I love giving baked goods for the holidays, but sometimes people have had enough cookies and fruit loaves.
Enter - the big muffin.
 If you have a pottery cereal bowl, it is the perfect size to bake "the big muffin" in.  Most pottery bowls are oven, dishwasher, and microwave safe.
The "big muffin" serves 4 comfortably, depending on the recipe and how full you fill the bowl. For comparison, the muffin on the right is from my largest muffin tin. I usually just do one at the same time as a batch of regular muffins - 24 mini muffins plus one giant muffin = a standard recipe for 12 muffins, or make one giant muffin and 6 to 8 regular muffins.


Toss it in a basket with a little homegrown tea, a mug, and a few pieces of fruit and you have a great gift for a hostess, teacher, neighbour, friend.  Or just simply put one into a cellophane bag and tie it closed with a ribbon and tag.  You could also gift it right in the bowl.

I'm testing out a few flavours that work for "the big muffin".  You want to pick a recipe that makes a rather moist muffin as the extra baking time can dry out some varieties.  Spiced oatmeal did not work very well.  Pina colada was delightful, blueberry cream was pretty good, and we haven't busted open the bran chocolate chunk but that's the one in the picture.

Happy baking, my friends.


Monday, 21 October 2013

Craft Show Prep meets Handmade Holidays


Craft show prep that will do double duty once the time comes for holiday decorating.

My next craft show is a mere 3 and a half weeks away.  I still have some work to do in the display department, so yesterday I got to it.  I scavenged up some large branches in the backyard and just chopped them up into random lengths.

This will give me the height variations I am looking for without filling up my table with boxes or larger blocks.
 Plus it gives me the versatility to add in some fresh elements if I can get my act together in time.
 They are absolutely perfect for displaying my tiny itty bitty items - like these fairy/gnome dish sets I am working on...
 ...without them getting lost on a large table.

And then when the holidays get here, I can use them again...
I only set up a small portion of it here since I was a little rushed for time, but picture this three or four times times longer...won't it be nice on my dining room shelf?  I might add in little containers of greens too.

I think I have plenty of blocks cut.

The inspiration came from this picture I found on Pinterest, but as far as I can tell, this is the original source.
Maybe I can convince someone to cut me some great big logs?  I don't use the chainsaw.

How are your handmade holiday preparations coming along?

Linking up with:  Keep Calm Craft On over at Frontier Dreams
                          The backyard Farming Connection - Hop
                          Creative Friday at Natural Suburbia
                          From the farm blog hop at Fresh Eggs Daily
                          Homemade Monday on Frugal by Choice, Cheap by Necessity 

Wednesday, 16 October 2013

An observation

I have noticed more and more lately that my "internet" community and my "actual" community are worlds apart.  Among most of my family and friends, I am the odd duck.  Among my "internet" community, I fit right in.  Here's what I mean:
My kids have chores.  They are expected to help in the kitchen.  They use knives, the oven, and the stove top. They peel, chop, stir, measure.  They cook.  One more so than the other, but they both do.  They have for years.  They are expected to do laundry...even folding.  They help in the garden.  Not all the time, but when there is work to be done, they get recruited.  They eat real food.  Food that grows in the dirt.  Food that is made from scratch (not all, but what we have time for).  Usually with whole wheat, sometimes quinoa, or millet.  All of this, to most people I know "in real life", is completely appalling.  Bordering on cruelty. (???) Their kids don't do chores.  Ever.  They have a thousand activities scheduled.  They eat out multiple times every week.  The rest of the food comes from a box because there is no time to cook with all those activities.  They firmly believe whole grains are for hippies, or kids with food allergies - poor things.  They have never been in a garden, a thrift store, done a thing in the kitchen.  They don't even clean their own rooms.  They have every new gadget on the planet.  These are the kids that my children interact with every day at school.  The kids that they are around during their "formative years".  The kids that impact the way they view themselves as people.  The kids that can be downright nasty.  It's hard for the kids to be the odd ones out all the time, but we can't just change our way of life...our very sense of self, just to fit in.  Thankfully, they each have a couple of friends who are more open minded.  Friendships we try hard to "take care of" since they are hard to come by.

As for me, even though I live in the city - I garden, I cook, I can/preserve, I make things.  Things that take way more effort than a trip to the dollar store or box store.  I wear clothes that will last - not the latest trends.  I try to avoid plastic.  I will go without - just because of the excess packaging.  Around here: I'm different, odd, unusual, strange, eclectic.  Most of the moms at school think I am downright weird. 

Random picture from the weekend...totally unrelated, but isn't it adorable?
 
In my "internet" community, I feel like I fit right in.  So many of my "internet friends" as I call them, live the same way I do.  Probably because those are the people I seek out.  The blogs I read, and the people who read my blog...because we have common interests.  The people I learn from, since I don't know people with those skills in my "everyday, real world life".  I see the pictures of their kids cooking, helping out, doing chores, chopping wood.  It seems normal to me.

 And another, because it's pretty.

Obviously, there are people out there who live they way I do - my "internet friends".  Are we so few and far between that the only way we meet is over the internet?  Is it because I live in the city instead of the country?  Is it just a sign of the times (how depressing is that thought)?  Do some of you experience the same thing, or do you have friends and family that live the way you do? I'm just curious.

So a big thank you, to all my "internet friends" for being you.  Just exactly you.

Tuesday, 15 October 2013

DIY Birch branch packaging from cereal boxes

Handmade Holidays - another packaging upcycle...

I like to get as many things as possible ready in advance once the holiday season approaches.  I like to wrap gifts early to get them out of my closet, BUT, I don't like having them under the tree early as I think it puts too much emphasis on the gifts, and over stimulates children.  I think I have come up with a solution:
These faux birch branches can go out early, as part of the decorations, and I am the only one who will know they are stuffed with little gifts.  They are pretty easy to make, too:

You will need:  cereal boxes (one box makes one branch, but 2 boxes makes 3 branches)
                        a tube to wrap the cardboard around - the "shaper" (I used a tube of caulking)
                        a circle to trace that is larger than your tube (I used a mason jar lid) 
                        carpenter's glue
                        white paint, paint brush, brown markers (or black)
Note:  You can make a short, thick branch, or a longer thin branch depending on which way you wrap your cardboard...just keep it in mind when painting (to follow).

Cut your cereal box to the size you need to fit around the tube, making sure to leave enough space to overlap.  Using white craft paint, lightly brush on streaks to represent the paper-like birch bark.
 Continue layering on the paint until you have the look you like.

Loosely wrap the "bark" around your tube "shaper", run a bead of carpenter's glue along the edge and use rubber bands to secure it in place. Allow it to dry completely before pulling out your "shaper".
Add some birch markings to your "branch" using markers, pencil crayons, or paint.

Trace your "shaper" onto the cardboard and then trace a larger ring around it. Use a pencil, and mark it lightly so that it won't show when you are done (or mark it on the patterned side).  Here, I traced the caulking tube for the inner ring, and the mason jar lid for the outer ring.  Note: you want your cap to fit INSIDE your finished cardboard tube, so when cutting your notches, you want to go all the way inside the inner line.
Draw on the notches that you need to cut, as in the picture above.  If you are doing this with a child, I recommend marking the cutouts all the way around.  If you are doing it yourself, you can eyeball it.
Cut the notches.  I didn't go far enough here, so I had to go back and cut the slits a little longer, to go to the inside of the inner ring.

Draw the growth rings on the cap.  I made mine all wonky and freehand, but you could use a stencil or compass if you like.

Bend down all of your tabs, making sure to bend them far enough to fit inside your bark tube.

Run a bead of glue inside the tube, close enough to the edge that your tabs will reach.

Insert your cap and let it dry.

 Insert your little gift.

Glue the remaining cap on the other end.
Ta-LAAA!  A couple of little presents that will be camoflauged as decorations.  Sneaky sneaky.  I plan to do this with anything that will fit in the tubes...I would like a good little pile of them.  I might even leave some empty ones on top.

                          Wildcrafting Wednesday at Mind Body and Sole 
                          Creative Friday at Natural Suburbia
                          From the Farm Hop at Fresh Eggs Daily
                          Homemade Monday on Frugal by Choice, Cheap by Necessity 
 

Thursday, 10 October 2013

From the Kiln

Just in time for fall, the first batch of oak leaf pendants/ornaments/gift tags is out of the kiln...
 I'm not sure how it shows up on your screen, but the brown/red one came out perfectly the colour of the darker oak leaves on our street...darker than the ones from the park that are pictured with it.
I love them...and it's good timing too because I just sold my last one a few weeks ago.  They are in my Etsy shop right now.

The quilt block serving dish is also out.  I will be making more of these soon, if my attention span allows.
I chose to glaze half of it in clear, and half in blues, greens, and turquoises because so often that's how you see the blocks pieced together in a full quilt.
 I handled it 5 or 6 times before I noticed this...
...tiny bit of glaze that skipped on the underside of the plate (it's hard to notice white on white).  So now I am undecided if I sell it as a second at a reduced price or not at all.  I think I might save it for a show where I can point it out in person because I would hate for someone to buy it and not realize it was there...even though it doesn't affect the function of the piece.  It is still waterproof, oven safe, and microwave safe.

I would appreciate your thoughts on that...anyone out there who sells hand made items - do you sell your imperfect items, or just stash them away somewhere?  And on the flip side...anyone who purchases  hand made items - when it is the tiniest little imperfection, would you skip the piece completely, or would you appreciate having a chance to buy a unique item at a reduced price because of it?

In other news:
my son is now starting to bring home his shop class projects.  I'm enjoying seeing how much he likes the class, and I'm impressed by the quality of his work.  Funny thing is, he keeps pointing out that tiny little gap - but the piece of wood he was given wasn't as wide as the pattern called for, so he had to do some "fandangling" on his own.  I think it turned out great for a first project that required modifications.

Now the hard part - choosing the paint colour(s).

Wednesday, 9 October 2013

Last weekend, we went on a picnic

...and took some pictures...


...with the kids...
...and my lovely sister (also taking pictures) and her husband.

It was awesome.