Pages

Sunday, 20 November 2011

Handmade Holidays - Advent Calendars

I am joining Plain and Joyful Living for Handmade Holidays again this week.

We have two advent calendars at our house, neither of which involve candy, treats, or daily gifts, so I thought I would share for those of you who are interested.

The first is an assembly of little forest friends:

This is what it will look like this year a few days into December.  Here's how it works:

A few years ago, my boys received this advent calendar as a gift:


It comes with little forest animals, their food, and a Santa Clause and you are supposed to put each thing in its own little cardboard box and open a box each day and put the toy on the cardboard background, which we did the first year.  The second year, we set up a little forest of branches from our garden and had the little animals come one per day to the forest (we eliminated the santa after the first year...in fact, I'm not even sure we used him the first year either).
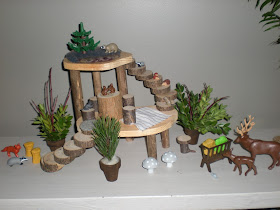
Last year, we chose a little girl toy that we already had, and built her this little "house".  We collected fallen branches from our yard, cut them down and nailed them together to build the stairs, the columns are branches that are cut down to the same size, and for the two floors, the boys drew out rough shapes on some scrap wood, which I cut using a jigsaw and then we sanded the edges.  At the time, the boys were 8 and 11 and it was one of the first projects they designed and built themselves (other than the chopsaw of course).

For the first few days of December, the boys would set up the little animal food that came in the original Playmobil set, and then the animals would come join the little girl at her house.  They liked this a lot better as they could move things around daily and set up little "scenes"...and of course, tell stories about what was going on in that little world.
This year, we added a little wooden table and stools, the wooden mushrooms, and the little planters filled with snippets from the yard.  We started a little bed as well, but we made it entirely to big to fit in the house.  (The top platform is maybe 4" and the whole thing is about a foot tall).

My goal is to eventually replace the little plastic animals with clay ones, but in 2 years, I have only made a mama hedgehog with a baby, an owl, and an egg, and only 2 have any paint an them at all.  Maybe by the time my kids are grown, I will have enough for the 24 days???

Our second advent calendar used to look like this:

Several years ago I glued 25 magnets to the back of little wooden shapes that I had in my stash.  I painted them to represent candies:
and ornaments:
and winter or holiday images:
Each day, they move one magnet down from the top to decorate the tree, and reveal the date under the magnet.
The tree was just a quick hand drawn image on paper that was attached to our stove with more magnets.  I had run out of time to make the one I wanted, and ...well...it just never got done.  This year, I am finally making the tree.  It is wool (the trunk and branches) and cotton (the needles) on linen (hand woven by my grandmother).  This is how far I have gotten so far:


I still need to finish the needles and add the dates along the bottom, and make some sort of pockets on the back to insert magnets.  I have a week and a half left, right?  I really hope to finish in time.

If you are working on something you would like to share, leave a link in the comments.  Happy Making!
Wednesday, 16 November 2011

Tiny gifts and magic walnuts

Sometimes, a handmade gift is so small you have to come up with some original packaging so that the gift itself doesn't disappear.
When I was a child, we called these friendship bracelets.  Remember these?  This summer, they seemed to be a big hit locally. I decided to make one for each of the boys BUT, I have to make sure that they can find such a tiny thing in their stocking.

The solution?  Magic walnuts!

These are a bit time consuming, but the result is fantastic.  Here's how:

Insert a butter knife into the small opening in the top of a walnut and give it a gentle twist.  If you do it slowly, it should pop right in half along the side cracks.  You may have to go through a few to get the hang of it, but it works.

Hollow out the inside and use those nuts for your favourite tasty recipe.


Place your gift inside the walnut being careful that no part of it overlaps the top "edge" of the split walnut.


I added the team name in mine, but this could be a note, a joke, a name, anything you want.

Glue the two halves back together. 
The first year I made these, I put a small wrapped chocolate and a joke inside each walnut.  I made a bowl full of them and just left them out for the kids at our holiday party to discover.  It was pure magic! 

Tip:  If you are placing a gift in the walnut and want it to open easily, just put a few tiny drops of glue on one half and press them together, holding for about a minute or so.  Like this:


If you are going to put them out, expecting people to use a nutcracker to open them, use a line of glue all around the outside of the lip and hold the two halves together, just until they set.  Let them dry (overnight is good if you will be cracking them open with a nutcracker).  I have used white glue in the past, as well as carpenters glue.  Both work well.

You can stop here if you want them to look like a regular walnut.  I decided to wrap a piece of crochet cotton around mine, and added a tag.

Other tips: 
Adding the crochet cotton is much easier with two people, one to hold the walnut and one to tie the knot.  It is possible to do it by yourself, but the thread keeps slipping off and it is kind of frustrating.  Just a thought.
If you are going to make more than one of these at a time and they are for different people, consider placing the walnut on a piece of paper with a note to help you keep track.  I had to split one back open to remember which one was for which child.
Also, those tags are SMALL.  Have a few extra on hand in case your cat wants to "help".  By the way, cats really like magic walnuts.  :)  You may have to spend some time chasing your walnuts around.

Happy making!

Tuesday, 15 November 2011

silhouettes and a revelation

I am constantly being told how similar my boys look.  They are often asked if they are twins.  Here is the thing...they are three years apart, and their personalities are night and day, so I just don't see it.  Do you get that too, where you see someone based on their personality, rather than their actual appearance?  I never even thought about it until a few people started pointing out that I see people differently than most.  Hmm.
Anyways, what I couldn't see in person shows up on paper...

We needed to make some silhouettes for a secret project the boys are working on.  Now, I see it!
Not twins, mind you, but I see the similarities.  N is on the left and S is on the right.

Have a nice day.

Friday, 11 November 2011

Small gifts

This is my very first post ever, so I hope you will have patience with me as I learn how to do this.

I am joining Plain and Joyful Living's Handmade Holiday - 2011.  I am happy to be able to join in the fun.

I wanted to come up with a little game that I could include in each of my boys' stockings this year.  Something that they could use on their own, or play together.  I finally decided on the game "Shut the Box".

I cut a scrap piece of oak from our kitchen renovation into little "tiles" using a chop saw.  Then I sanded down the edges one by one.  I used a wood burning tool (one I had not picked up since childhood) to burn the markings into the tiles.  This took a lot longer than I thought...I think maybe my tool is too old.  I was quite pleased with how this turned out for my older child (12) but I didn't like it for the younger (9) so I sanded down some more tiles and used a marker to add the numbers to his.

I think he will like this one much better.  If I were to do this again, I think I would paint the numbers on instead.  The nice thing is I still have time to do another set if I decide to.
Each set has enough tiles to play a regular game with nine tiles, a game with twelve tiles, and another set of nine for "Double Shut the Box."  I made a small pouch using some leftover brown faux suede.
This is how it will be packaged up.  The tag is a slice from a fallen branch with the initials drawn on.  I will probably actually redo the tag with a nice fancy letter painted on.  I am hoping to do tags like this for all of the gifts this year.  I still have to print up a set of instructions, but as they are readily available on the internet, that shouldn't be too complicated.  Then I can add variations more suited to each child.